

- Chrome 50+
- Firefox 44+
- Edge 17+
- Opera 42+
Implementation
- If you are new and want to implement Token-based Push Notifications in your app, follow our platform-specific guides:
- For Android and iOS we also have setup that allows the usage of Native calling screens:
- Token management to manage FCM and APNs tokens for the logged-in user.
- Mute functionality to mute certain conversations or implement DND.
Web
The Push Notification extension allows you to send push notifications to mobile apps and desktop browsers. Push notifications will work in all desktop browsers which support Push API. These include:- Chrome 50+
- Firefox 44+
- Edge 17+
- Opera 42+
I want to checkout the sample app
Push notifications sample app for Web (React)View on Github
Firebase Project Setup
Visit Firebase Console and login/signup using your Gmail ID.Step 1: Create a new Firebase Project
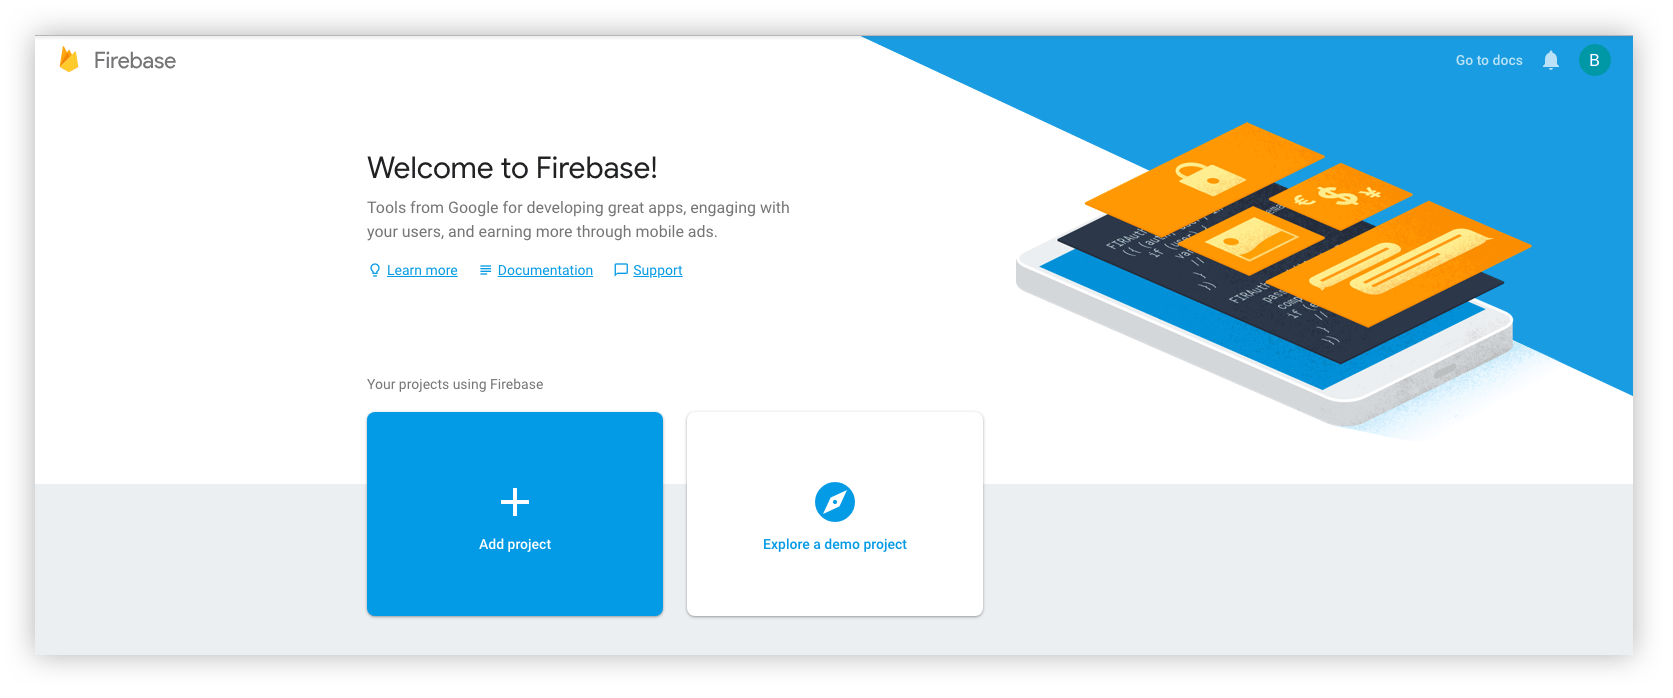
- You give a name to your project
- Add Google Analytics to your project (Optional)
- Configure Google Analytics account (Optional)
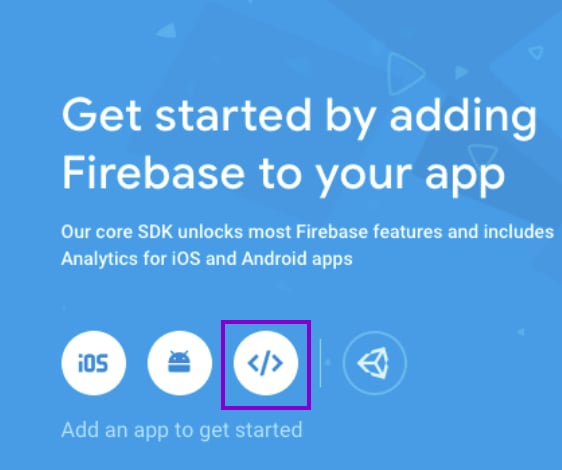
Step 2: Add Firebase to your Web App
- Click on the Web icon on the below screen and Register your app with a nickname.
- Once done, click on Continue to Console.
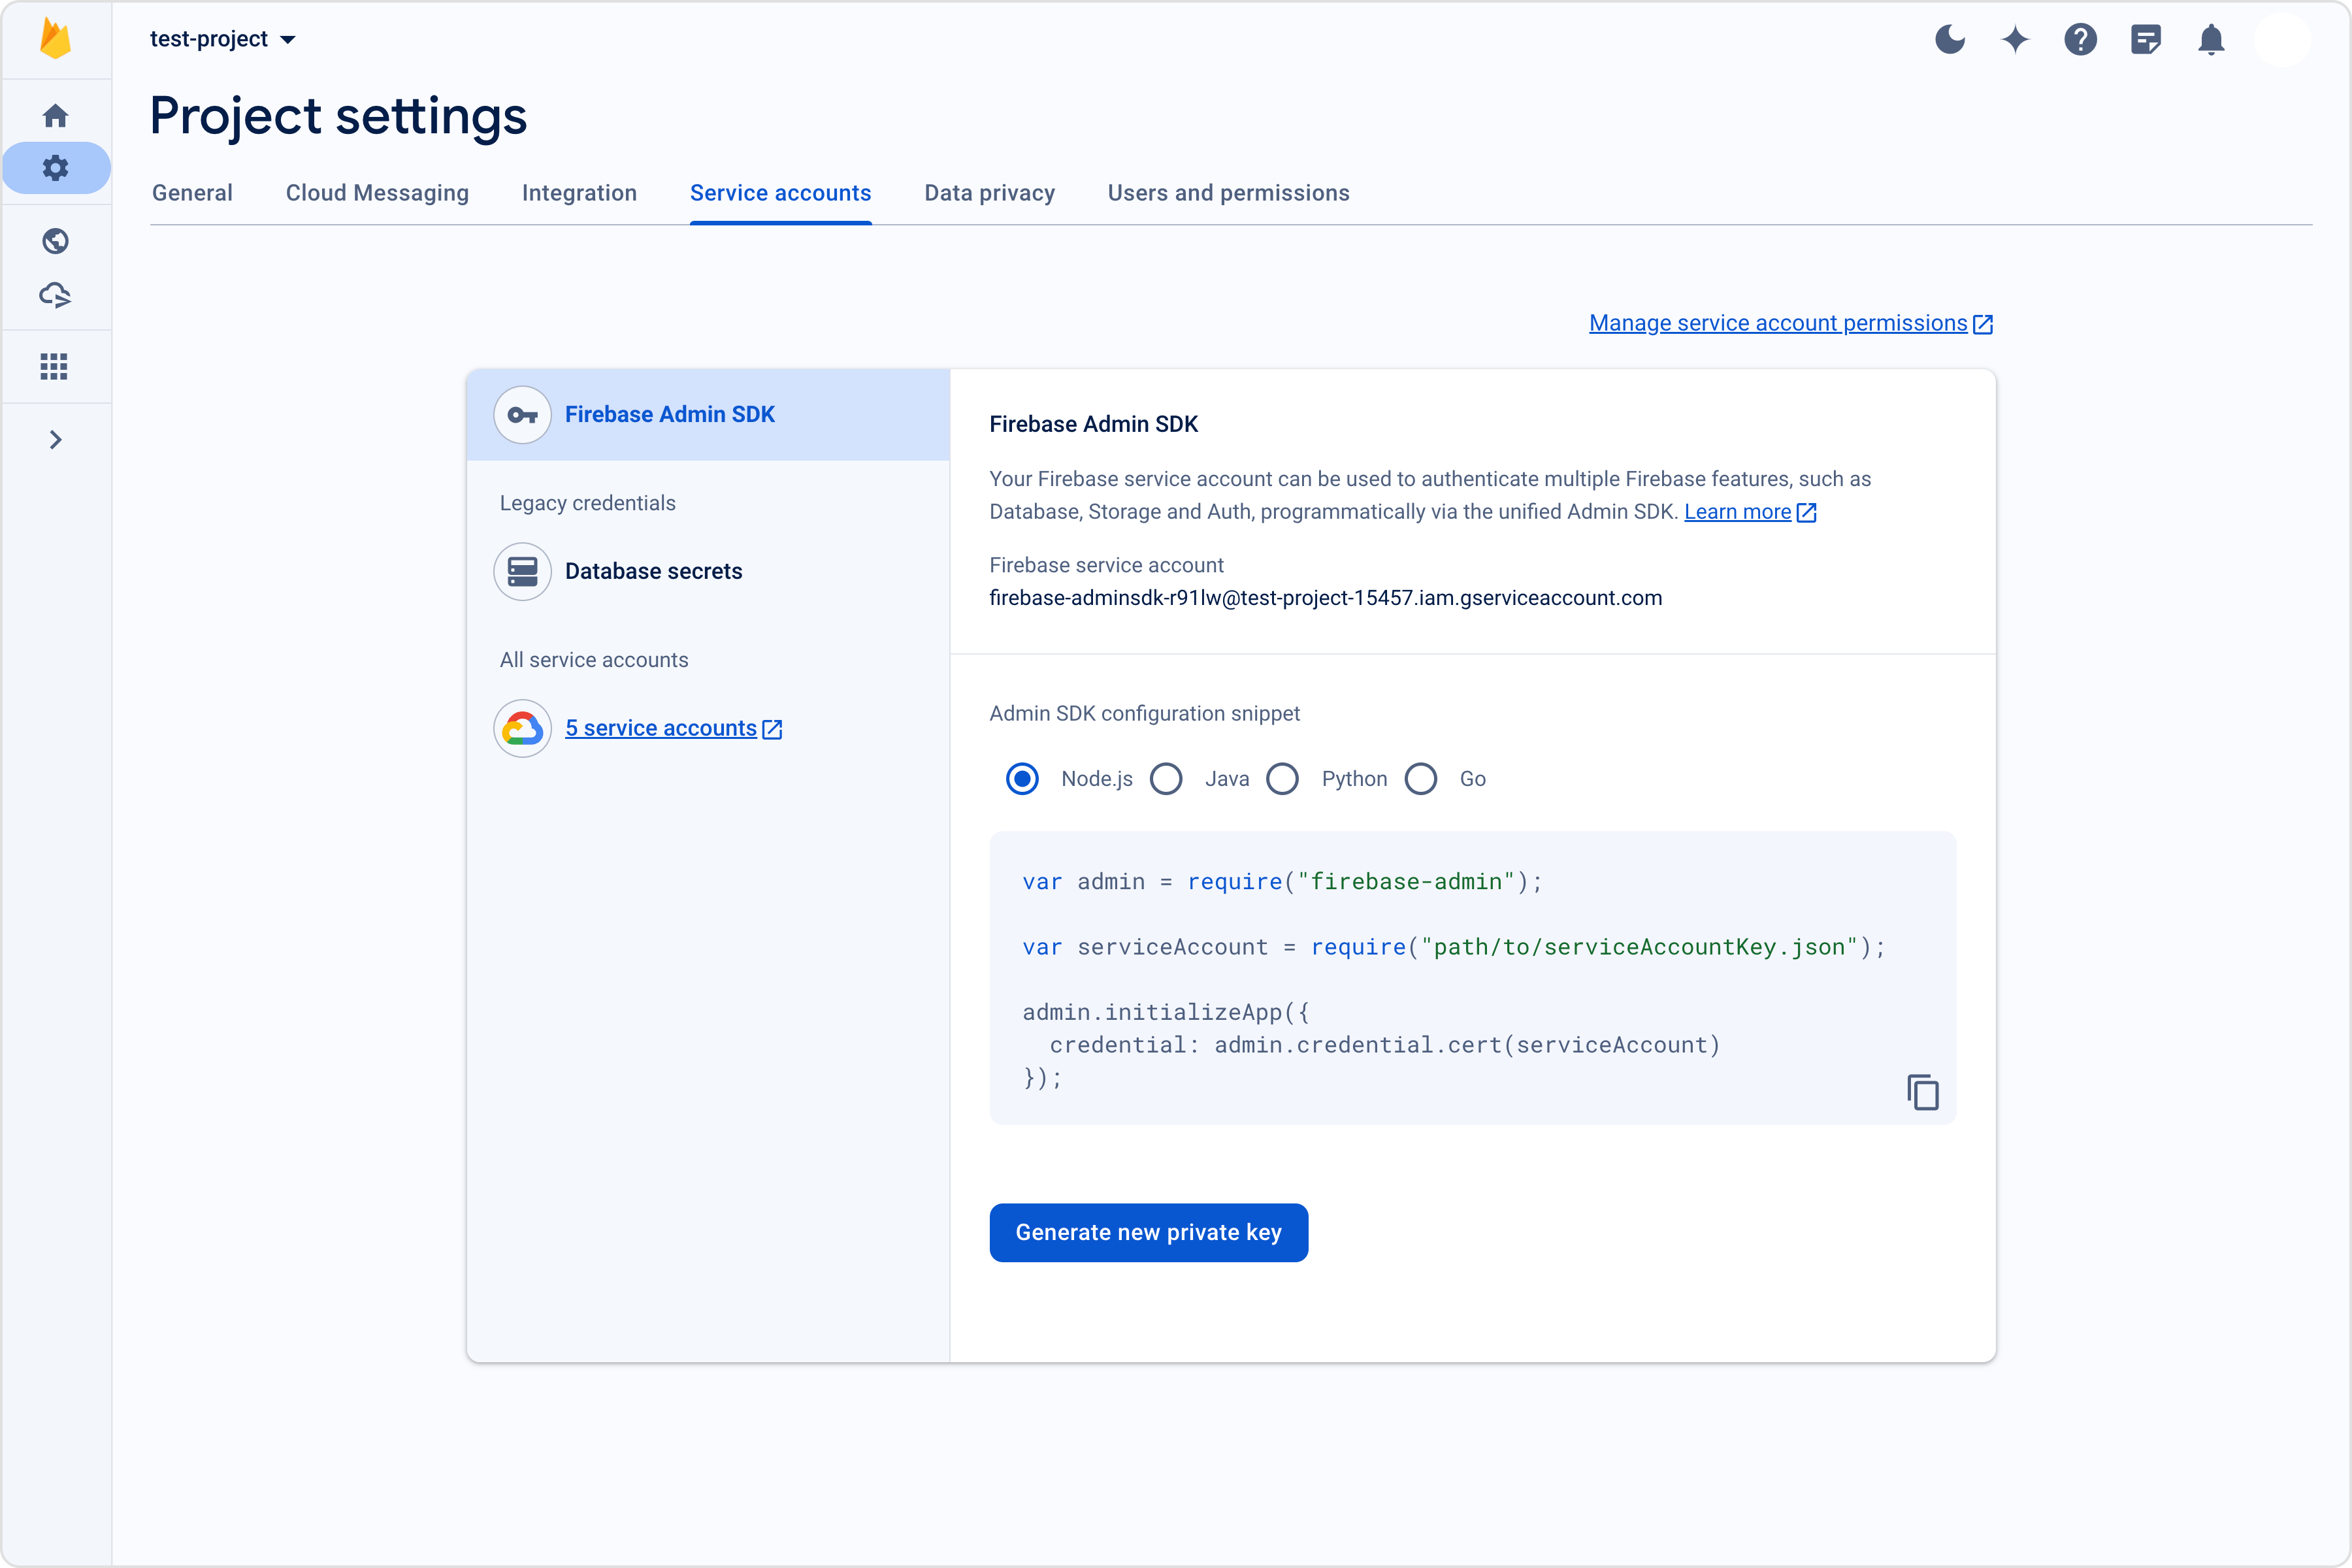
Step 3: Download the service account file
Extension settings
Step 1: Enable the extension
- Login to CometChat and select your app.
- Go to the Extensions section and Enable the Push Notifications.
- Open the settings for the extension and add all the mentioned settings and hit save.
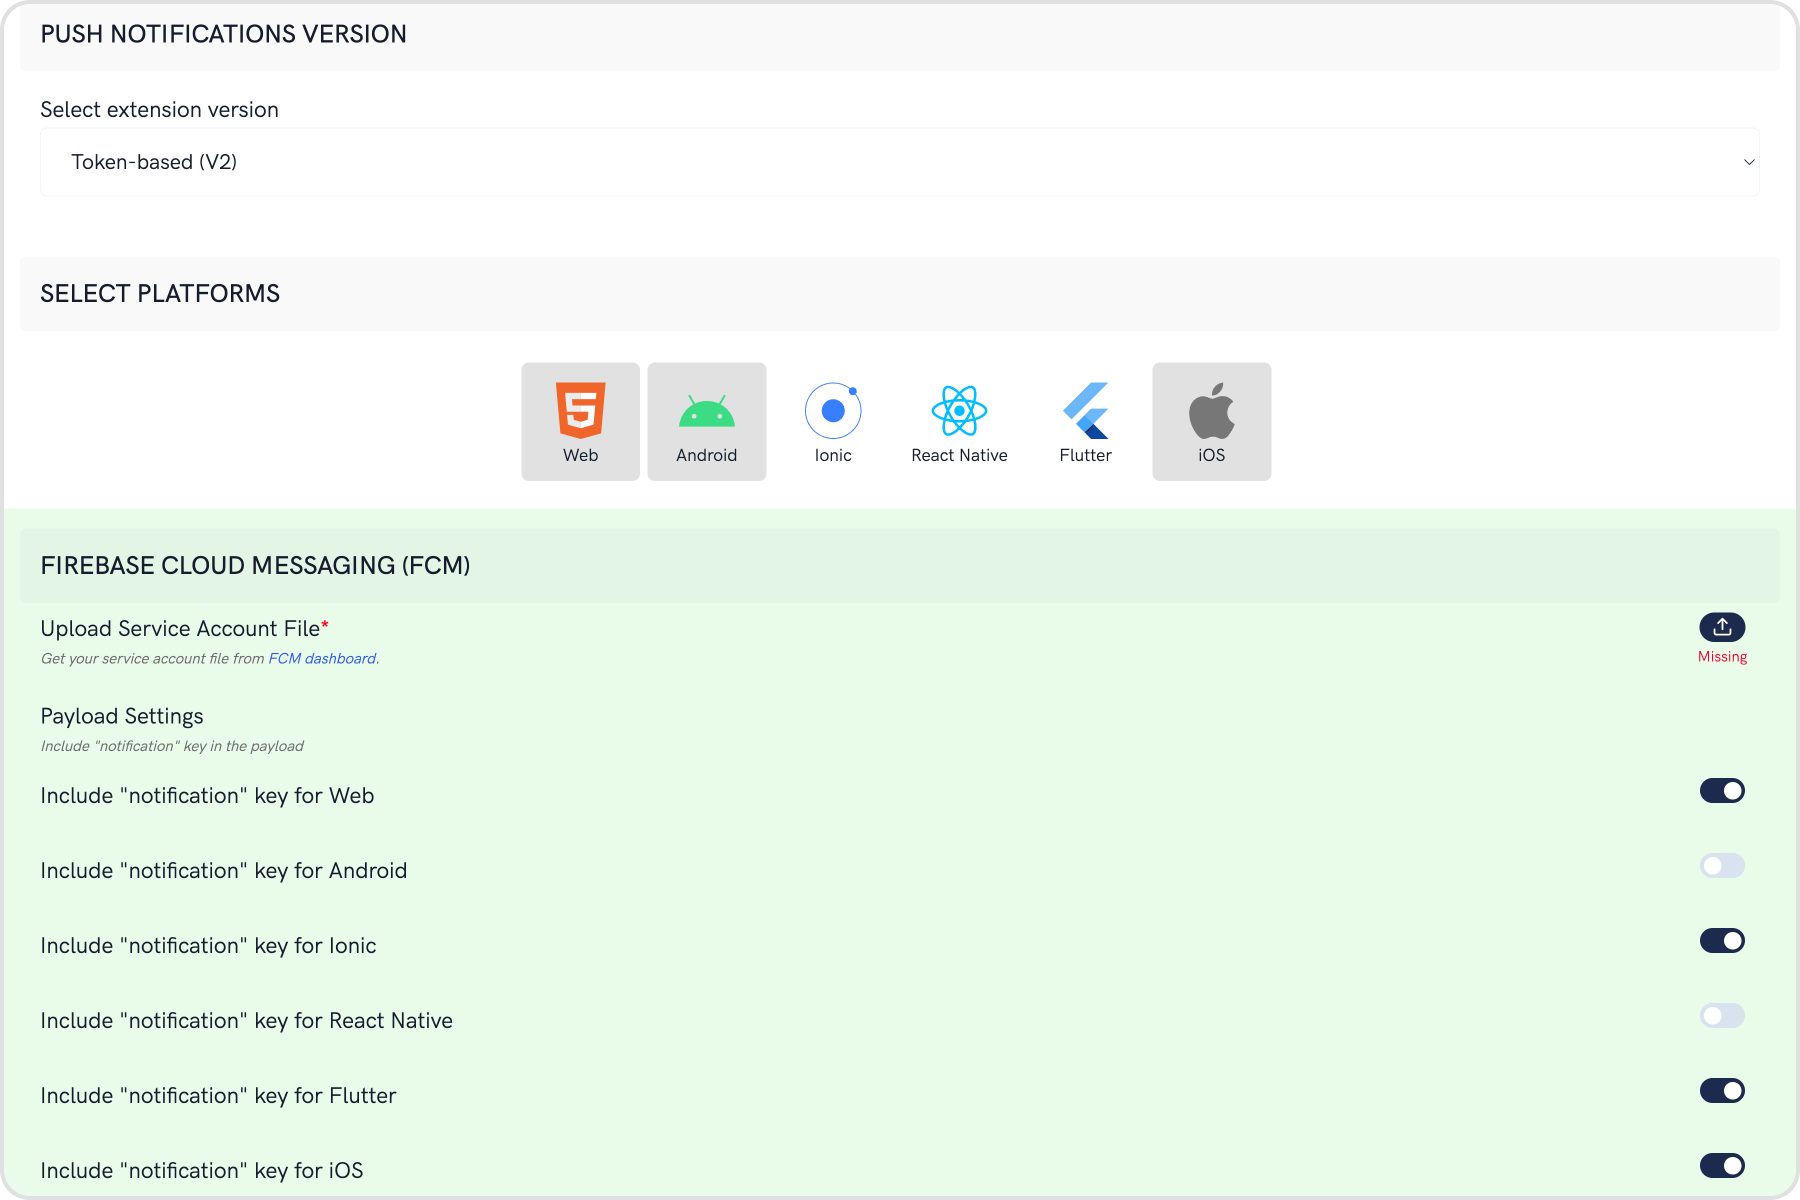
Step 2: Save your settings
On the Settings page you need to enter the following:- Set extension version
- If you are setting it for the first time, Select
V2to start using the token-based version of the Push Notification extension. - If you already have an app using
V1and want to migrate your app to useV2, then SelectV1 & V2option. This ensures that the users viewing the older version of your app also receive Push Notifications. - Eventually, when all your users are on the latest version of your app, you can change this option to
V2, thus turning offV1(Topic-based) Push Notifications completely.
- Select the platforms that you want to support
- Select from Web, Android, Ionic (Deprecated), React Native, Flutter & iOS.
- Notification payload settings
- You can control if the notification key should be in the Payload or not. Learn more about the FCM Messages here.
- Push payload message options
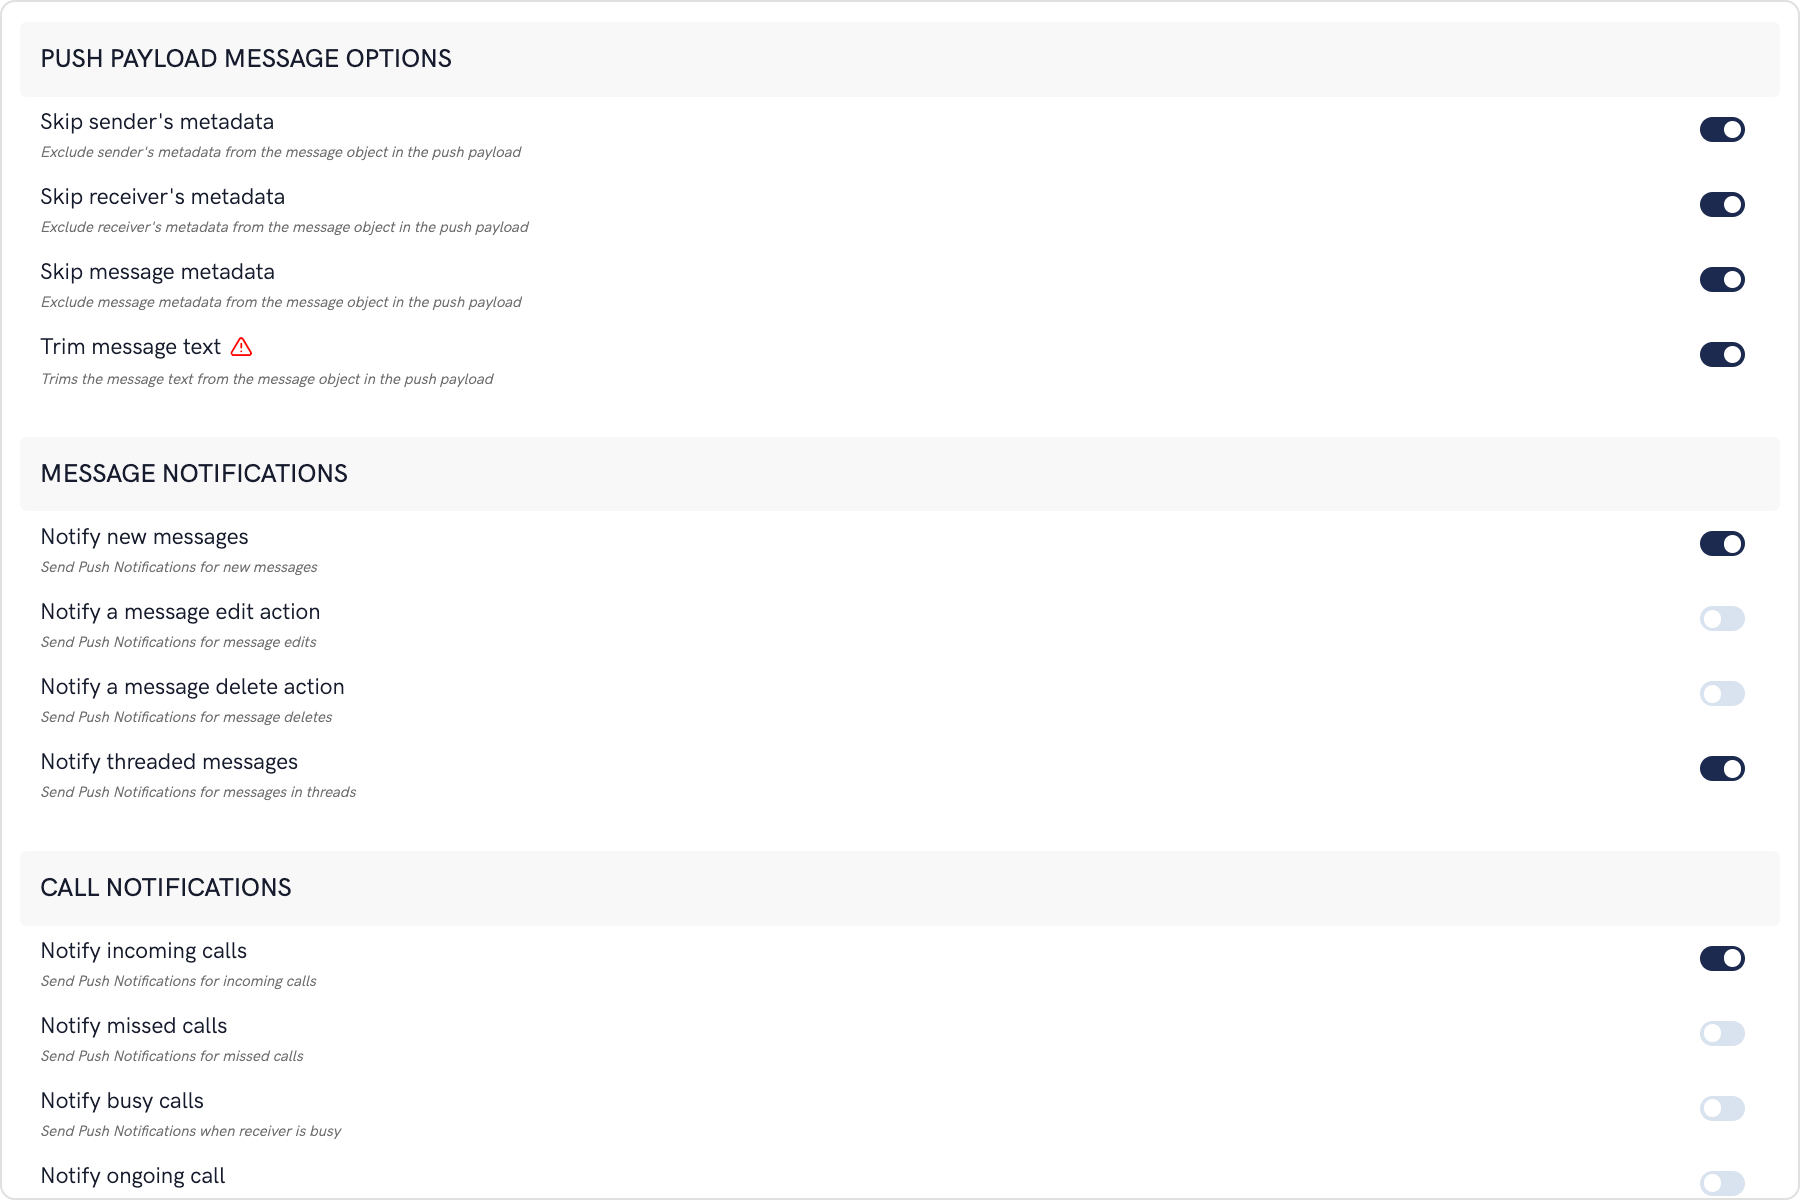
- The maximum payload size supported by FCM and APNs for push notifications is approximately 4 KB. Due to the inclusion of CometChat’s message object, the payload size may exceed this limit, potentially leading to non-delivery of push notifications for certain messages. The options provided allow you to remove the sender’s metadata, receiver’s metadata, message metadata and trim the content of the text field.
- The message metadata includes the outputs of the Thumbnail Generation, Image Moderation, and Smart Replies extensions. You may want to retain this metadata if you need to customize the notification displayed to the end user based on these outputs.
- Notification Triggers
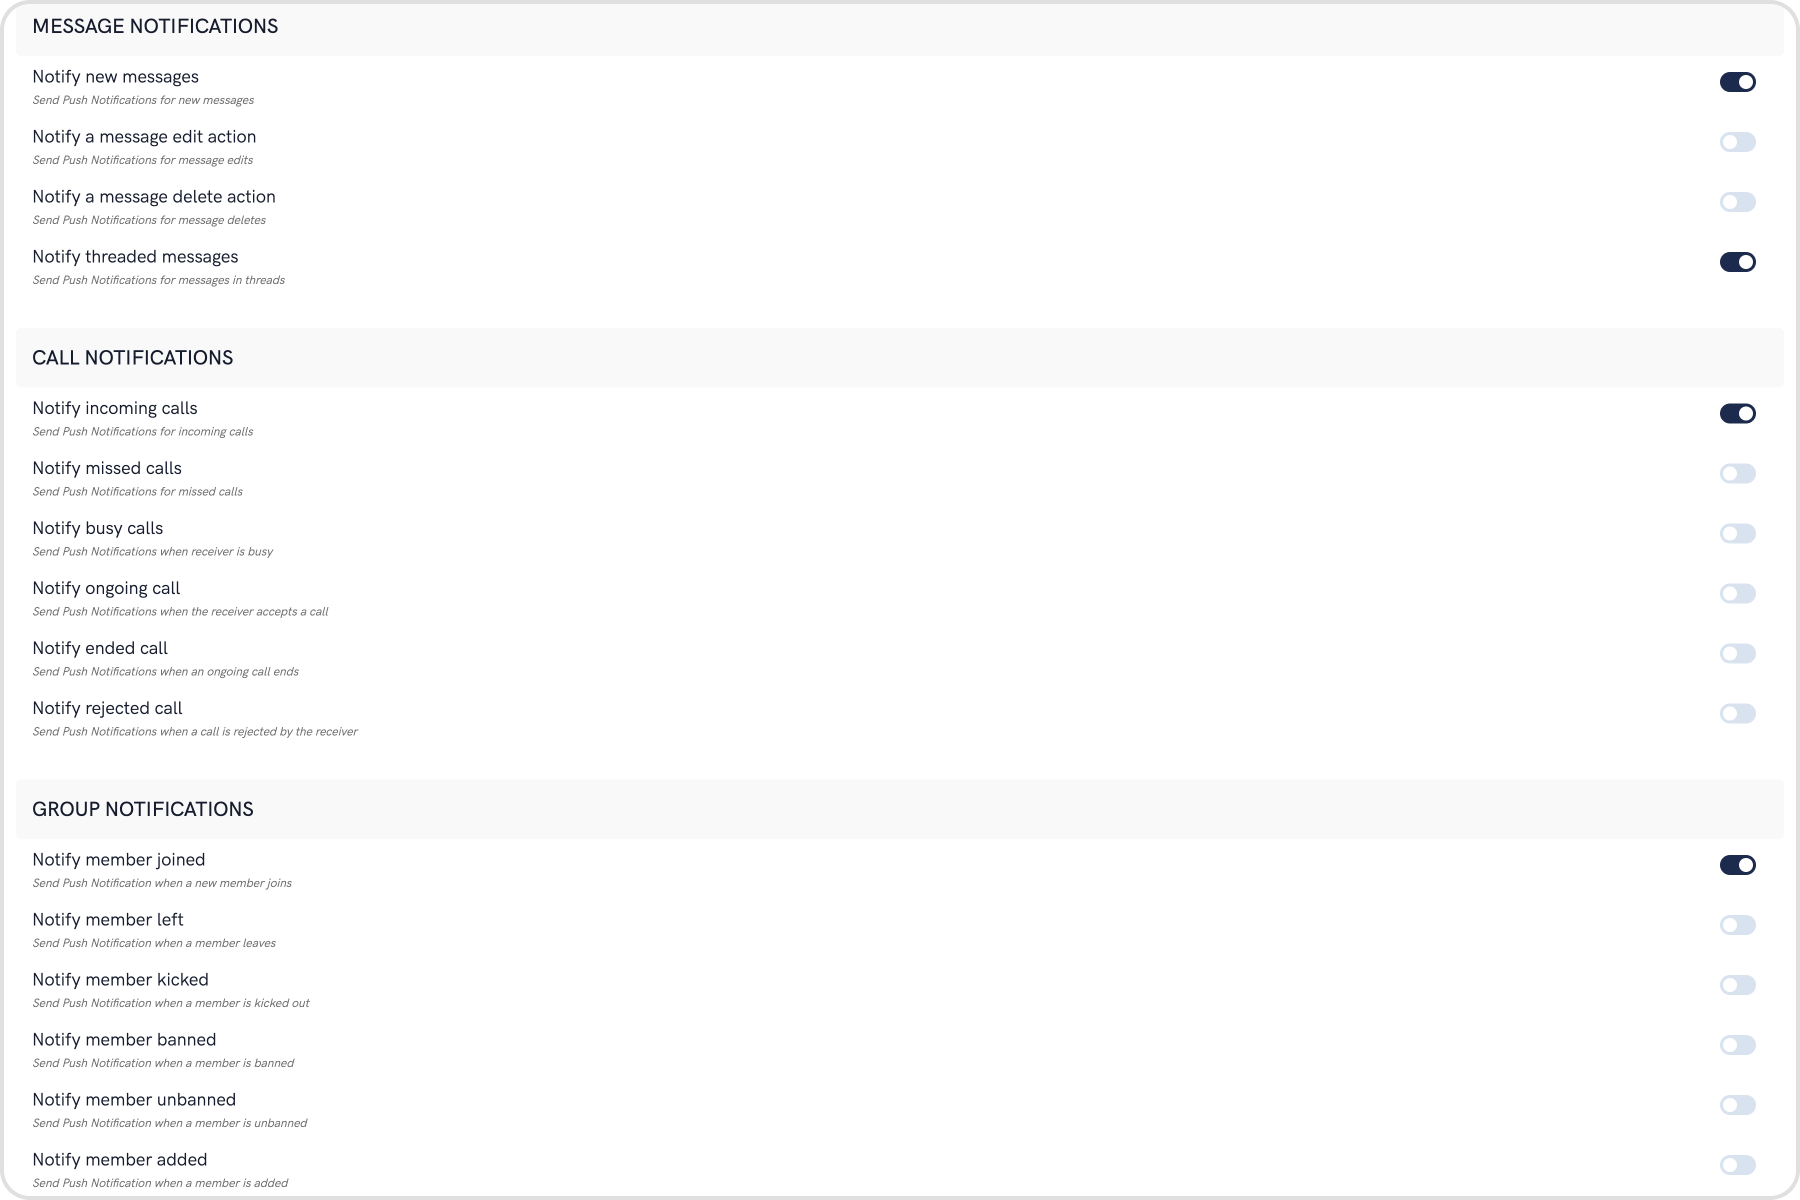
-
Select the triggers for sending Push Notifications. These triggers can be classified into 3 main categories:
- Message Notifications
- Call Notifications
- Group Notifications
- These are pretty self-explanatory and you can toggle them as per your requirement.
Web App Setup
Step 1: Folder and files setup
Create a folder with the following three files:Step 2: Add the Firebase Config to the HTML File
- Go to the Firebase Console and click on the Web app and open up the Settings page.
- Go to the “General” tab on the Settings page.
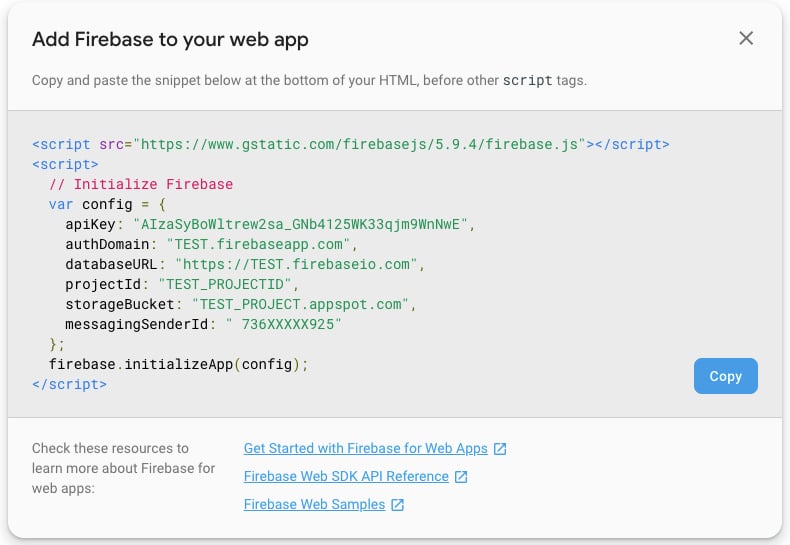
- Scroll down and copy the Firebase SDK snippet and paste in the <head> tag of your index.html file.
Step 3: Setup index.html file
- Include the latest CometChat library using CDN.
- Register the service worker file.
-
Also, include the
PushNotification.js. -
The <body> has a simple form:
- Text input for UID.
- Login button.
- Logout button.
index.html file should look like this:
- HTML
Step 4: Setup the service worker file
- Use
importScriptsto include thefirebase-app.jsandfirebase-messaging.jsfiles in the service worker. - Also paste in the
FIREBASE_CONFIGobject again in this file. - Initialize the Firebase object using the config.
- Call the messaging() on the Firebase object.
firebase-messaging-sw.js file should look like this:
- JavaScript
Step 5: Setup the PushNotification.js file
Now our simple web app has the following:- Setup required to start using Firebase SDK.
- Service worker registration when the index.html loads for the first time.
- Initialize CometChat.
- Login using CometChat user.
- Ask for the User’s permission to show Push Notifications.
- If permission is granted, obtain the
FCM_TOKEN. - Register the obtained
FCM_TOKENwith the extension.
- First delete the token using the firebase object.
- Logout CometChat user.
login and logout functions in the PushNotifications.js file. You can copy paste the below code. Do not forget to replace the APP_ID, REGION, AUTH_KEY of your app in the code below.
- JavaScript
Start receiving Push Notifications
- You can now host the project folder using Nginx, Apache web server, or even VSCode Live server extension.
- Launch the web app in a browser and open the browser console to see the logs.
- Enter the UID of the user and click on login.
- When asked for permission to show notifications, click on Allow.
- Once you see logs saying that the FCM Token has been registered, either send the browser tab to the background or close it completely.
- Send a message to this logged-in user from another device (using our Sample Apps) and you should be able to see the Push Notifications.
Stop receiving Push Notifications
- Reopen the previous closed browser tab and click on logout.
- The
FCM_TOKENwill be deleted on the extension’s end on theCometChat.logout()call. - As a good practice, the
FCM_TOKENshould also be deleted using thefirebase.messaging().deleteToken().
Custom body for notifications
To send custom body for notifications or to receive notification ofCustomMessage, you need to set metadata while sending the CustomMessage.
- JavaScript
Android
The Push Notification extension allows you to send push notifications to mobile apps and desktop browsers. In this section, we will see how to send Push Notifications to your Android app using Firebase Cloud Messaging or FCM.Use Connection ServiceIf you want to use the System’s native call service to handle calls, please refer to our guide on Android - Connection Service
I want to checkout the sample app
Android Push notifications sample appView on Github
Firebase Project Setup
Visit Firebase Console and login/signup using your Gmail ID.Step 1: Create a new Firebase Project
On your Firebase Console, create a new project.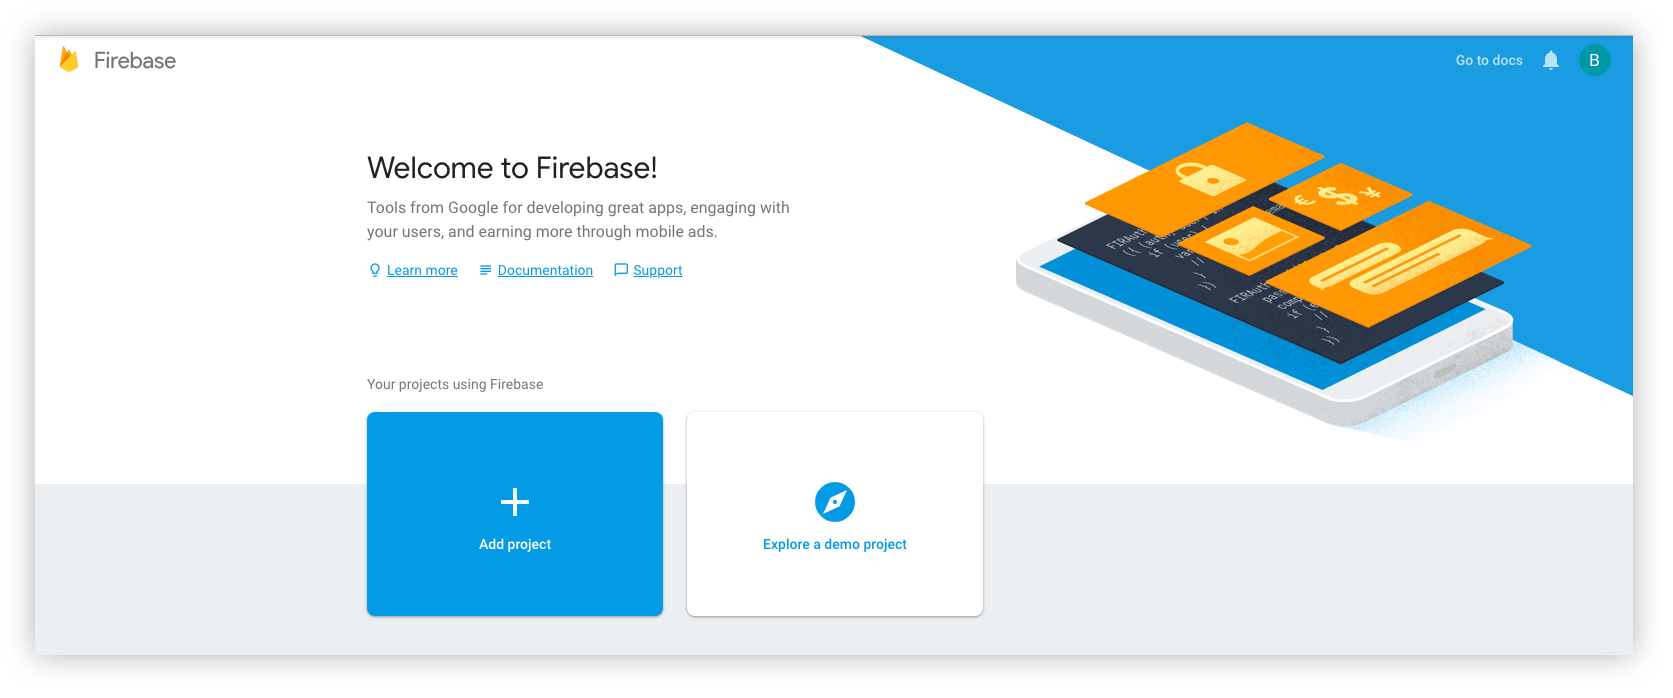
- You give a name to your project
- Add Google Analytics to your project (Optional)
- Configure Google Analytics account (Optional)
Step 2: Add Firebase to your Android App
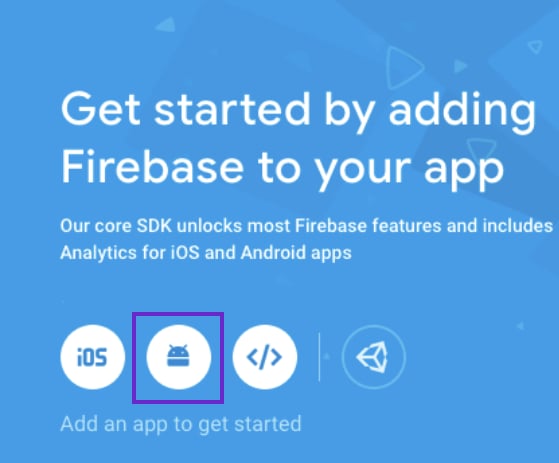
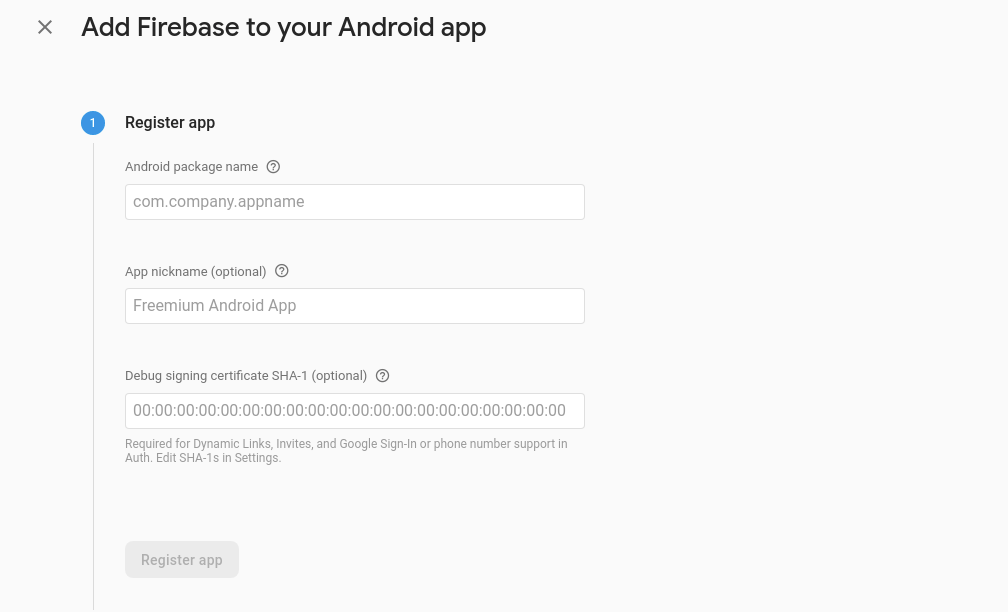
- Click on the Android icon as shown on the screen below.
-
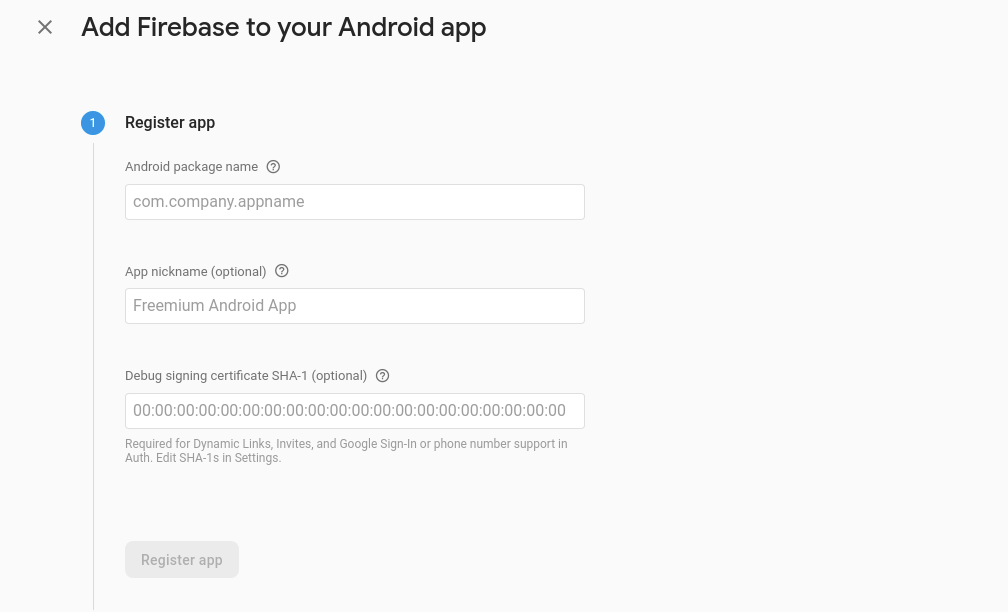
Register your Android app by providing the following details:
- Android Package name
- App nickname (optional)
- Debug signing certificate SHA-1 (optional)
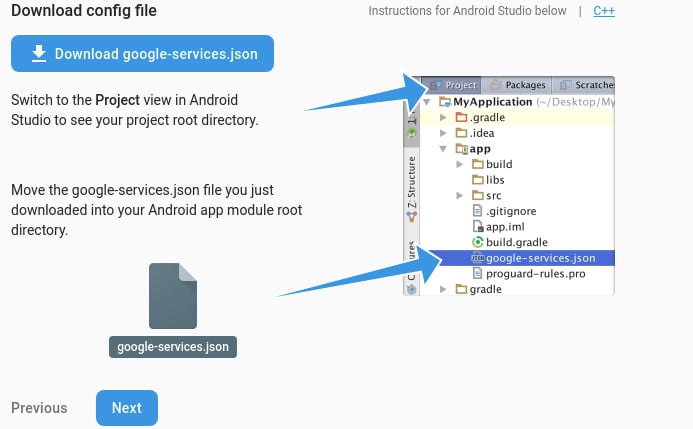
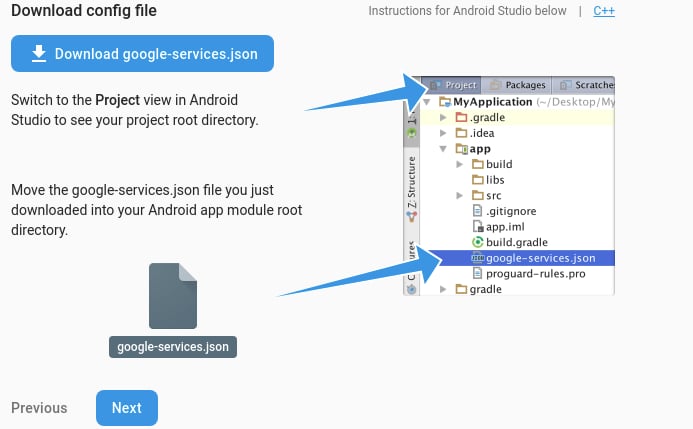
- Download the
google-services.jsonfile and place it in the required location in your project.
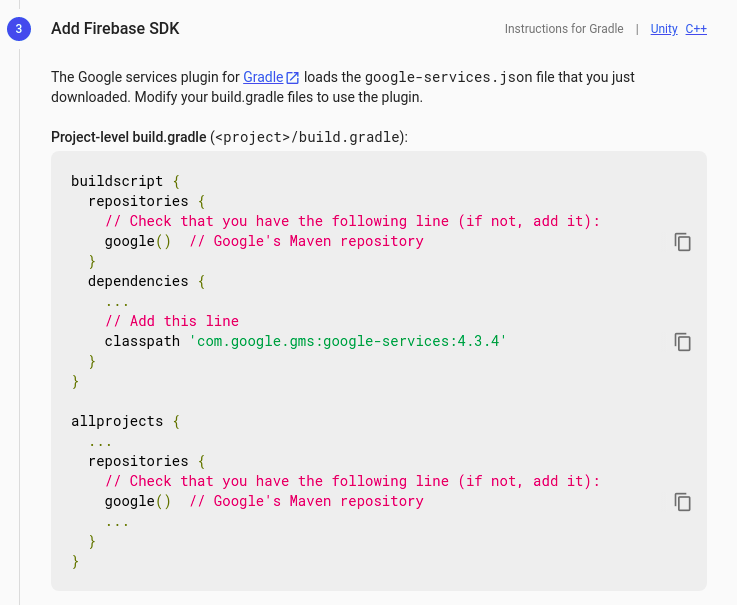
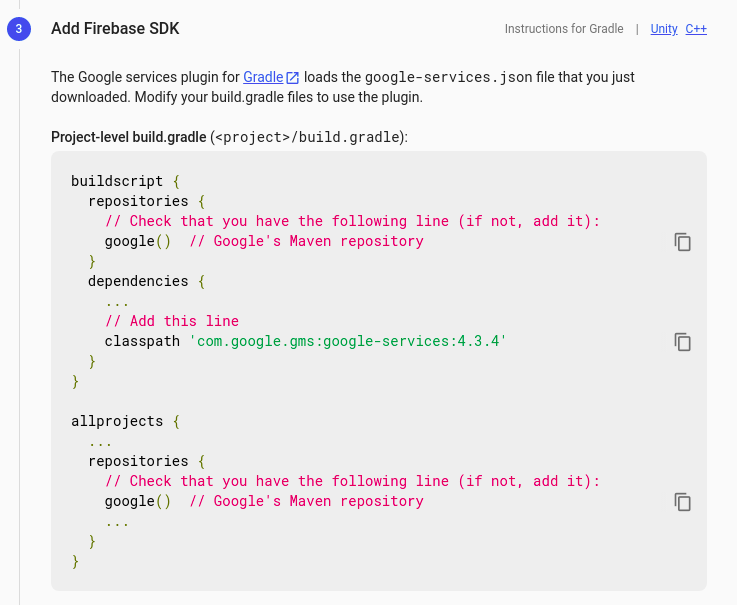
- Add Firebase SDK by copying and pasting the snippets in the Project-level
build.gradlefile.
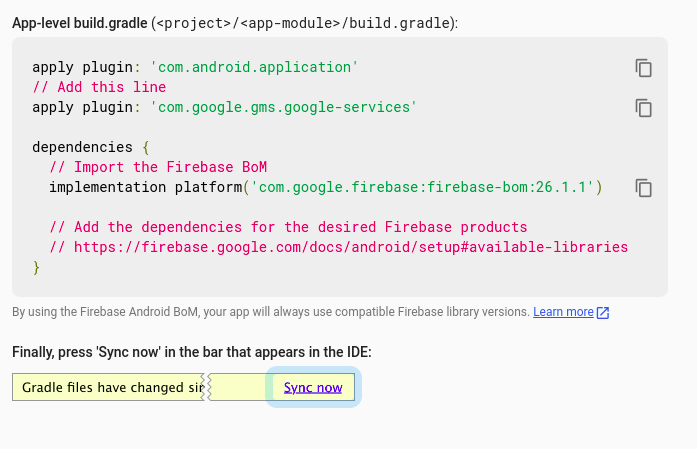
- Add Firebase SDK by copying and pasting the snippets in the App-level
build.gradlefile.
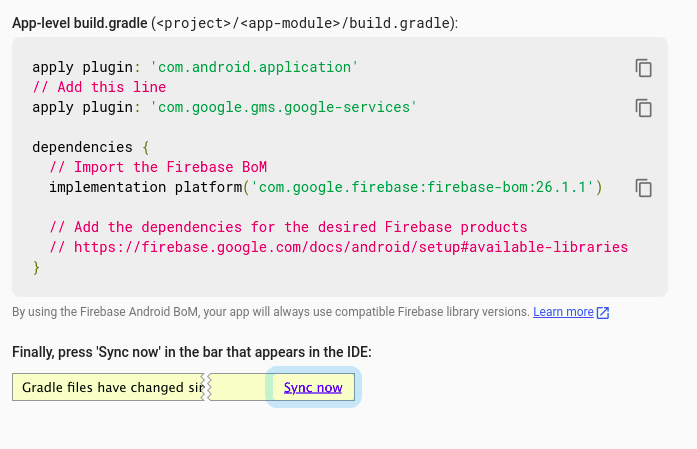
- Click on ‘Continue to Console’ to finish the setup.
Step 3: Download the service account file
Extension settings
Step 1: Enable the extension
- Login to CometChat and select your app.
- Go to the Extensions section and Enable the Push Notifications extension.
- Open the settings for this extension and save the following.
Step 2: Save your settings
On the Settings page you need to enter the following:- Set extension version
- If you are setting it for the first time, Select
V2to start using the token-based version of the Push Notification extension. - If you already have an app using
V1and want to migrate your app to useV2, then SelectV1 & V2option. This ensures that the users viewing the older version of your app also receive Push Notifications. - Eventually, when all your users are on the latest version of your app, you can change this option to
V2, thus turning offV1(Topic-based) Push Notifications completely.
- Select the platforms that you want to support
- Select from Web, Android, Ionic (Deprecated), React Native, Flutter & iOS.
- Notification payload settings
- You can control if the notification key should be in the Payload or not. Learn more about the FCM Messages here.
- Push payload message options
- The message metadata includes the outputs of the Thumbnail Generation, Image Moderation, and Smart Replies extensions. You may want to retain this metadata if you need to customize the notification displayed to the end user based on these outputs.
- Notification Triggers
-
Select the triggers for sending Push Notifications. These triggers can be classified into 3 main categories:
- Message Notifications
- Call Notifications
- Group Notifications
- These are pretty self-explanatory and you can toggle them as per your requirement.
Android App Setup
In the Firebase Project setup, we did the following things:- Added google-services.json file to the project.
- Added the required Firebase SDK snippets to the Project-level build.grade file.
- Added the required Firebase SDK snippets to the App-level build.gradle file.
Step 1: Register the FCM Token on user login
- Initialize CometChat and then login your user.
- On successful login, you can register the obtained FCM Token using
CometChat.registerTokenForPushNotification()function call. (You can see the process of getting the FCM Token in the next step)
- Java
- Kotlin
- Java
- Kotlin
Step 2: Receive notifications
- The FCM Token can be received by overriding the
onNewToken()method. This token is stored as a String variable. You can choose to store it in SharedPreferences as well. - To receive messages, you need to override the onMessageReceived(RemoteMessage remoteMessage).
- PushNotificationService.java has the code that provides a way you can handle messages received from CometChat users and groups.
- CallNotificationAction.class is a BroadcastReceiver which is used to handle call events when your app is in the background state.
- Since Android O, there have been certain restrictions added for background tasks and users cannot launch intent directly from the service. More details here.
- We suggest you to create notification channel inside your application class. After Android O, it is necessary to register notification channel to allow notifications of your apps.
- Java
- You also need to add both of the above-mentioned files in your AndroidManifest.xml to make Push notification work in the background as well.
- XML
Advanced
Sending Custom Notification body
Push notification has 2 parts, namely, the notification title and notification body. The title can be: a. Name of the sender in case of one-on-one message. (E.g.: Nancy Grace) b. Name of the sender followed by group name for group messages (E.g.: Nancy Grace @ Hiking Group) The body of the message depends upon the type of message being sent. You can send a custom body by specifying thepushNotification key followed by some user-defined string for the notification body inside metadata while sending the message.
The following code shows an example of a Custom body using a message of category=custom. This is however not just limited to a custom category of messages.
- Java
- Kotlin
Converting Push Notification Payloads to Message Objects
CometChat provides a methodCometChatHelper.processMessage() to convert the message JSON to the corresponding object of TextMessage, MediaMessage, CustomMessage, Action or Call.
This code needs to be added to the onMessageReceived() method of the FirebaseMessagingService class.
- Java
Type of Attachment can be of the following the type
CometChatConstants.MESSAGE_TYPE_IMAGECometChatConstants.MESSAGE_TYPE_VIDEOCometChatConstants.MESSAGE_TYPE_AUDIOCometChatConstants.MESSAGE_TYPE_FILE- Text message
- Media message
Handle Push Notification Actions.
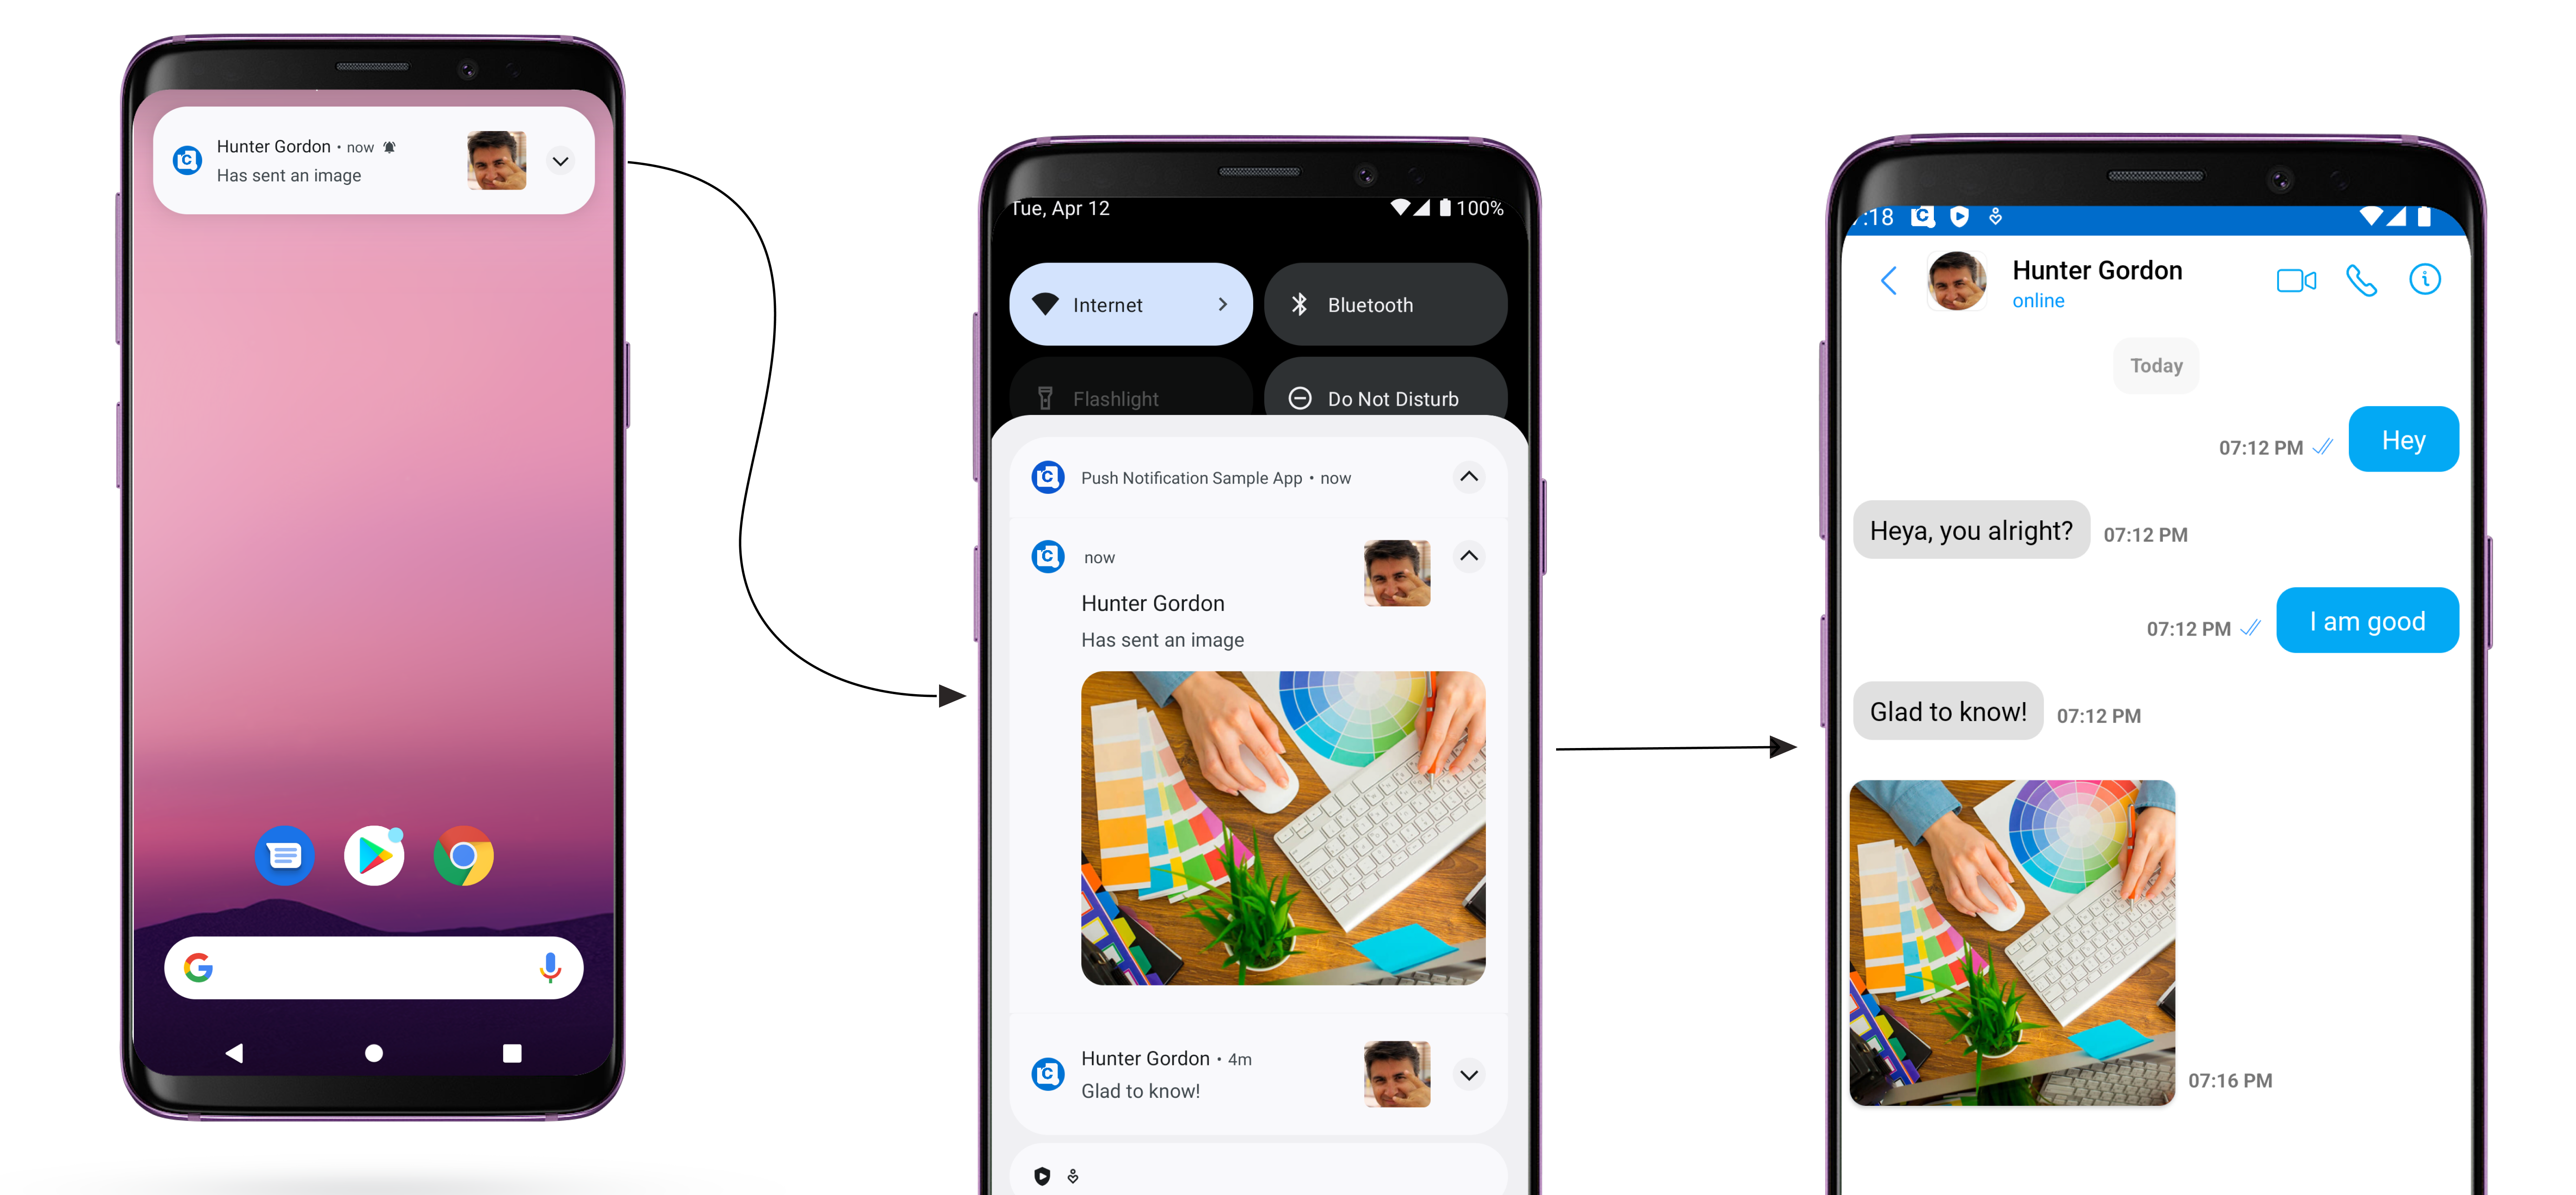
onMessageReceived(RemoteMessage message). You need to call CometChat.processMessage() method to process push notification payload.
- Java
CometChatMessageListActivity is part of UI Kit Library. You can replace CometChatMessageListActivity with your required class.
Android Connection Service
Learn how to send Push Notifications to your Android app using Firebase Cloud Messaging or FCM.I want to checkout the sample app
Android Push notifications sample appView on Github
Firebase Project Setup
Visit Firebase Console and login/signup using your Gmail ID.Step 1: Create a new Firebase Project
On your Firebase Console, create a new project.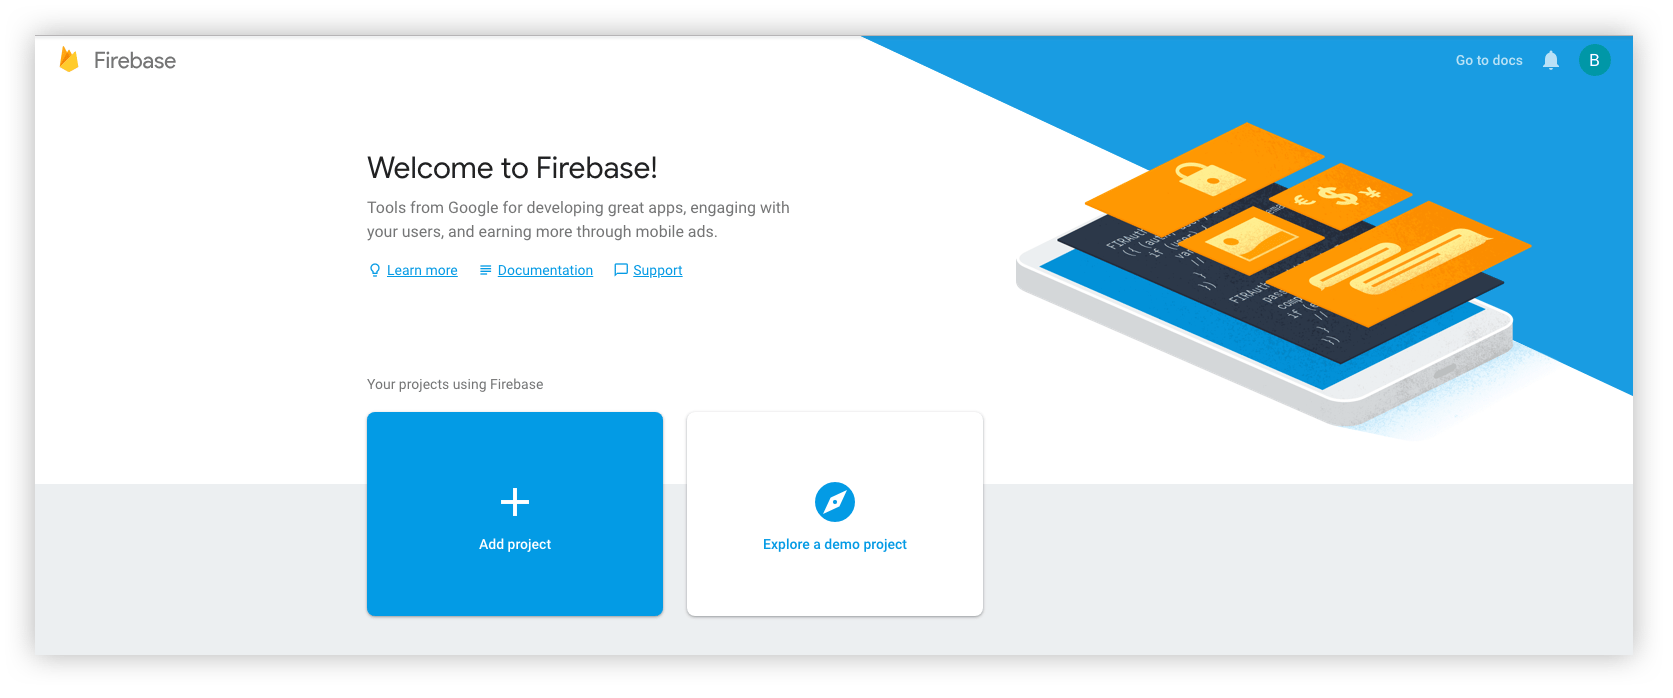
- You give a name to your project
- Add Google Analytics to your project (Optional)
- Configure Google Analytics account (Optional)
Step 2: Add Firebase to your Android App
- Click on the Android icon as shown on the screen below.
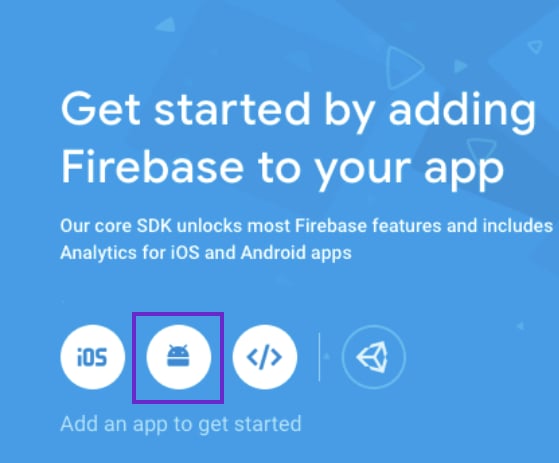
-
Register your Android app by providing the following details:
- Android Package name
- App nickname (optional)
- Debug signing certificate SHA-1 (optional)
- Download the google-services.json file and place it in the required location in your project.
- Add Firebase SDK by copying and pasting the snippets in the Project-level build.gradle file.
- Add Firebase SDK by copying and pasting the snippets in the App-level build.gradle file.
- Click on ‘Continue to Console’ to finish the setup.
Step 3: Download the service account file
Extension settings
Step 1: Enable the extension
- Login to CometChat and select your app.
- Go to the Extensions section and Enable the Push Notifications extension.
- Open the settings for this extension and save the following.
Step 2: Save your settings
On the Settings page you need to enter the following:- Set extension version
- If you are setting it for the first time, Select
V2to start using the token-based version of the Push Notification extension. - If you already have an app using
V1and want to migrate your app to useV2, then SelectV1 & V2option. This ensures that the users viewing the older version of your app also receive Push Notifications. - Eventually, when all your users are on the latest version of your app, you can change this option to
V2, thus turning offV1(Topic-based) Push Notifications completely.
- Select the platforms that you want to support
- Select from Web, Android, Ionic (Deprecated), React Native, Flutter & iOS.
- Notification payload settings
- You can control if the notification key should be in the Payload or not. Learn more about the FCM Messages here.
- Push payload message options
- The message metadata includes the outputs of the Thumbnail Generation, Image Moderation, and Smart Replies extensions. You may want to retain this metadata if you need to customize the notification displayed to the end user based on these outputs.
- Notification Triggers
-
Select the triggers for sending Push Notifications. These triggers can be classified into 3 main categories:
- Message Notifications
- Call Notifications
- Group Notifications
- These are pretty self-explanatory and you can toggle them as per your requirement.
Android App Setup
In the Firebase Project setup, we did the following things:- Added google-services.json file to the project.
- Added the required Firebase SDK snippets to the Project-level build.grade file.
- Added the required Firebase SDK snippets to the App-level build.gradle file.
Step 1: Register the FCM Token on user login
- Initialize CometChat and then login your user.
- On successful login, you can register the obtained FCM Token using
CometChat.registerTokenForPushNotification()function call. (You can see the process of getting the FCM Token in the next step)
- Java
- Kotlin
- Java
- Kotlin
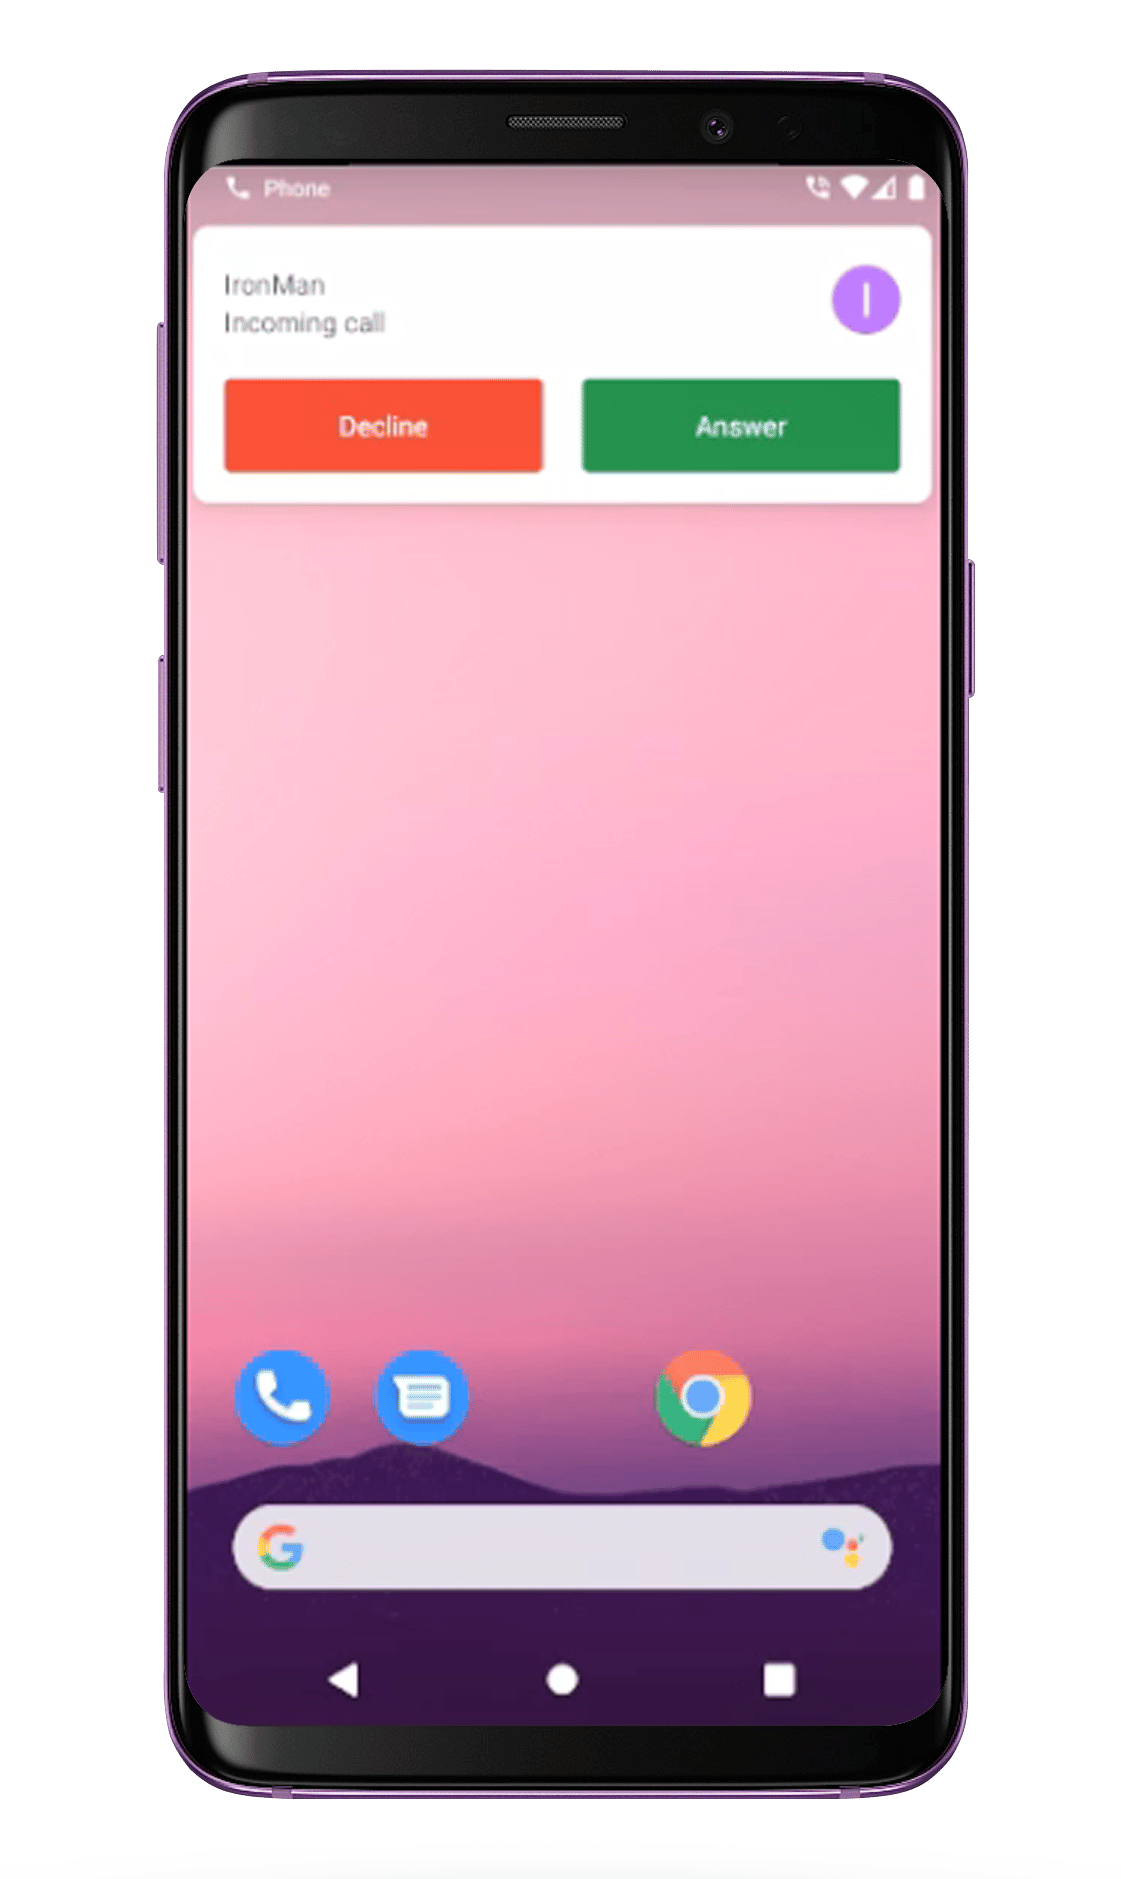
Step 2: Setup ConnectionService.
Step 3: Receive notifications
- The FCM Token can be received by overriding the
onNewToken()method. This token is stored as a String variable. You can choose to store it in SharedPreferences as well. - To receive messages, you need to override the onMessageReceived(RemoteMessage remoteMessage).
- PushNotificationService.java has the code that provides a way you can handle messages received from CometChat users and groups.
- Since Android O, there have been certain restrictions added for background tasks and users cannot launch intent directly from the service. More details here.
- You also need to add the above-mentioned MyFirebasMessagingService.java fil in your AndroidManifest.xml to make Push notification work in the background as well.
- XML
Converting Push Notification Payloads to Message Objects
CometChat provides a methodCometChatHelper.processMessage() to convert the message JSON to the corresponding object of TextMessage, MediaMessage, CustomMessage, Action or Call.
This code needs to be added to the onMessageReceived() method of the FirebaseMessagingService class.
- Java
Type of Attachment can be of the following the type
CometChatConstants.MESSAGE_TYPE_IMAGECometChatConstants.MESSAGE_TYPE_VIDEOCometChatConstants.MESSAGE_TYPE_AUDIOCometChatConstants.MESSAGE_TYPE_FILE- Text message
- Media message
iOS FCM
Learn how to send out Push Notifications to your iOS using Firebase Cloud Messaging or FCM.Don’t want to use FCM?You can refer to our setup using the Apple Push Notifications service (APNs).
I want to checkout the sample app
iOS Push notifications sample appView on Github
Firebase Project Setup
Visit Firebase Console and login/signup using your Gmail ID.Step 1: Create a new Firebase Project
On your Firebase Console, create a new project.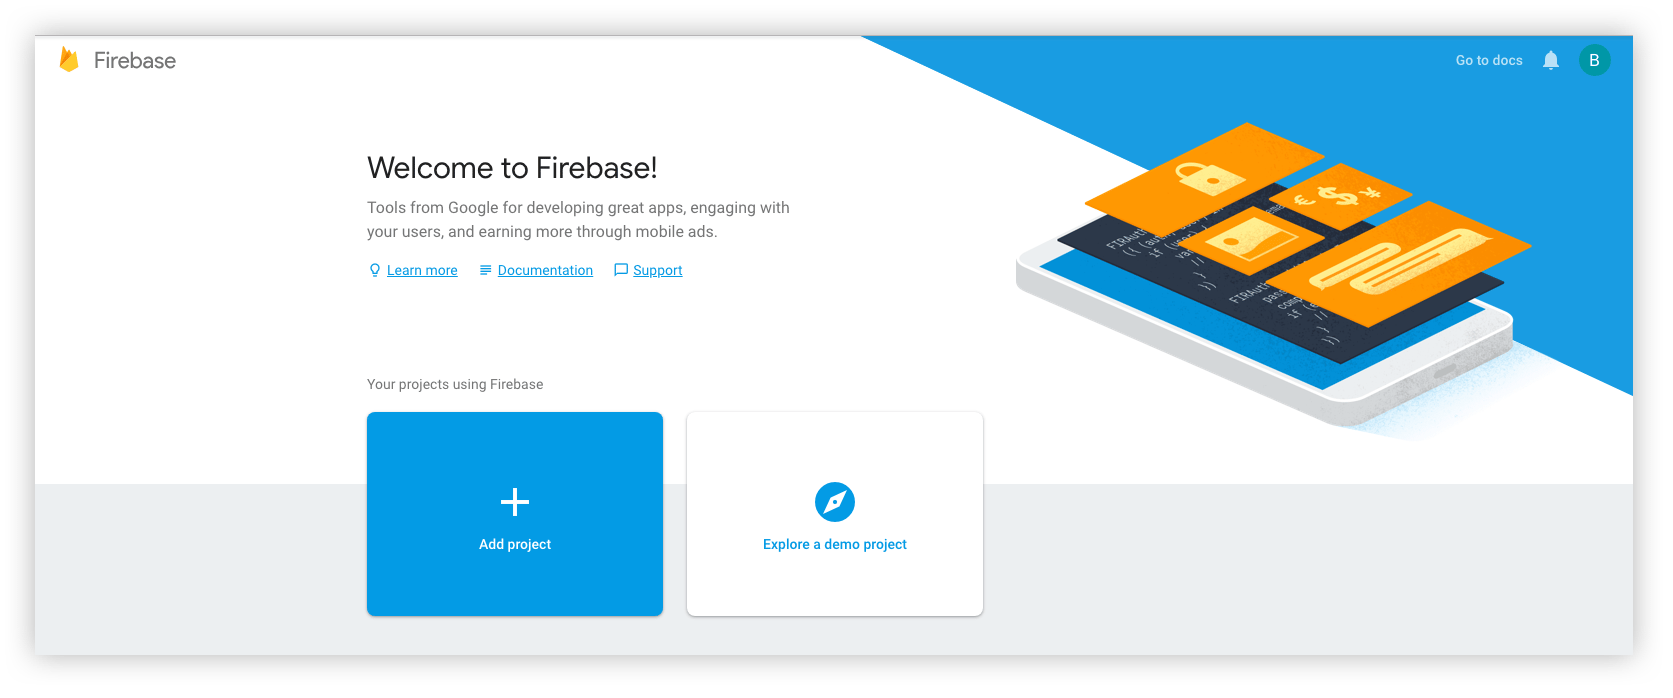
- You give a name to your project
- Add Google Analytics to your project (Optional)
- Configure Google Analytics account (Optional)
Step 2: Add Firebase to your iOS App
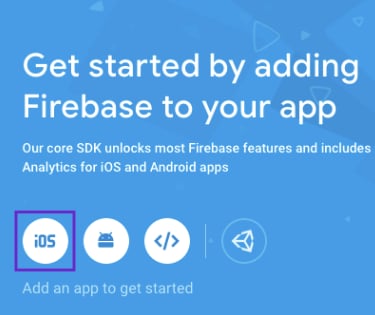
- Click on the iOS icon as shown on the screen below.
- Register your Android app by providing the following details: a. iOS bundle name b. App nickname (optional) c. App Store ID (optional)
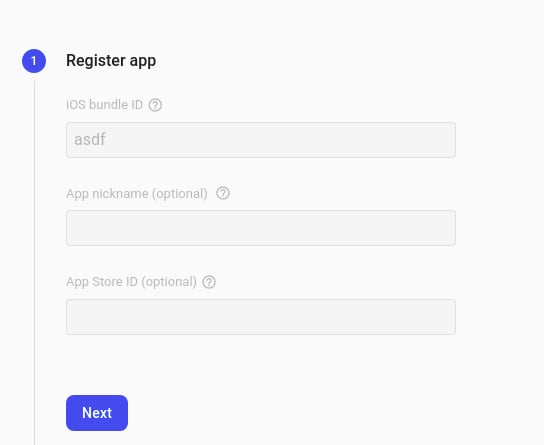
- Download the GoogleService-Info.plist file and place it in the mentioned location of your project. Move your config file into the root of your Xcode project. If prompted, select to add the config file to all targets as follows.
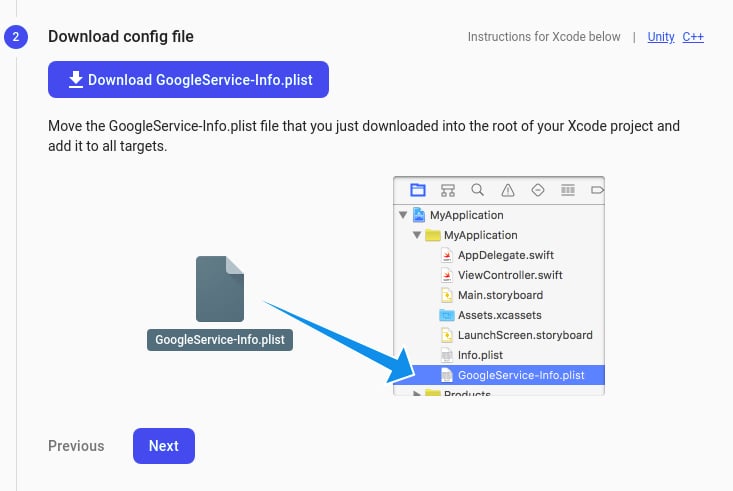
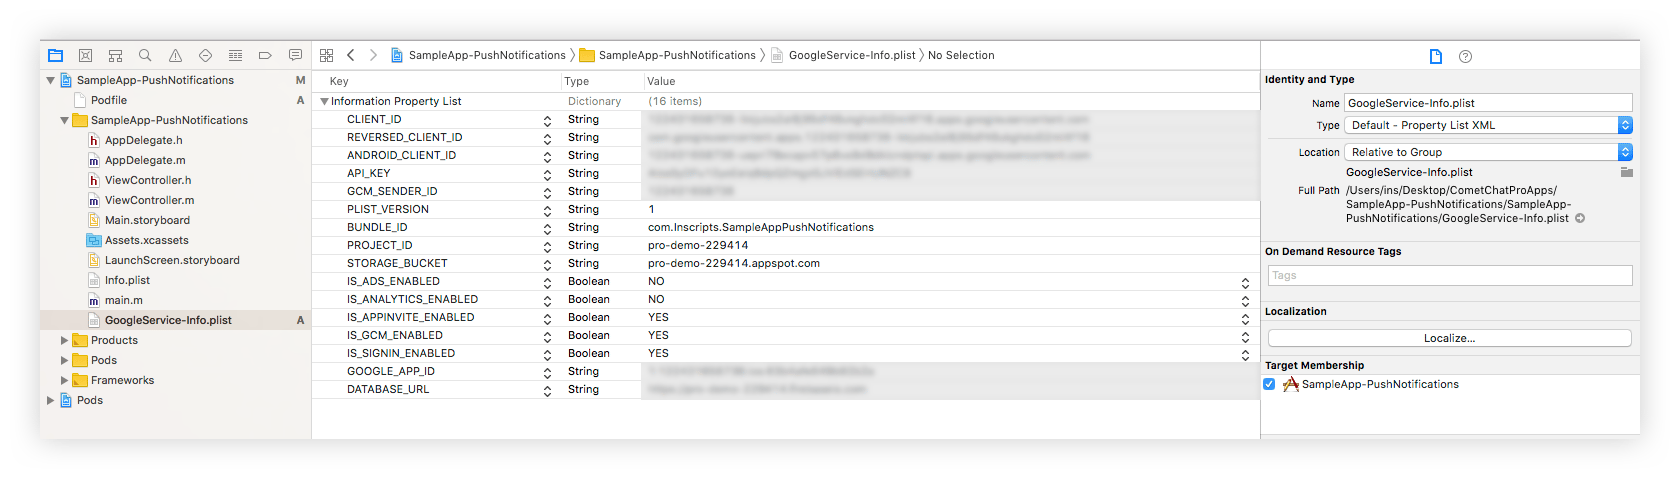
- We will Add Firebase SDK and Initialisation code later. So, click on ‘Next’, ‘Next’, and ‘Continue to the Console’.
Step 3: Download the service account file
Extension settings
Step 1: Enable the extension
- Login to CometChat and select your app.
- Go to the Extensions section and Enable the Push Notifications extension.
- Open the settings for this extension and save the following settings.
Step 2: Save your settings
On the Settings page you need to enter the following:- Set extension version
- If you are setting it for the first time, Select
V2to start using the token-based version of the Push Notification extension. - If you already have an app using
V1and want to migrate your app to useV2, then SelectV1 & V2option. This ensures that the users viewing the older version of your app also receive Push Notifications. - Eventually, when all your users are on the latest version of your app, you can change this option to
V2, thus turning offV1(Topic-based) Push Notifications completely.
- Select the platforms that you want to support
- Select from Web, Android, Ionic (Deprecated), React Native, Flutter & iOS.
- Notification payload settings
- You can control if the notification key should be in the Payload or not. Learn more about the FCM Messages here.
- Push payload message options
- The message metadata includes the outputs of the Thumbnail Generation, Image Moderation, and Smart Replies extensions. You may want to retain this metadata if you need to customize the notification displayed to the end user based on these outputs.
- Notification Triggers
-
Select the triggers for sending Push Notifications. These triggers can be classified into 3 main categories:
- Message Notifications
- Call Notifications
- Group Notifications
- These are pretty self-explanatory and you can toggle them as per your requirement.
Get APNS Credentials
The following steps in this section are written on the assumption that you already have an app ID assigned to your client app.Step 1: Create a Certificate Signing Request
To obtain a signing certificate required to sign apps for installation on iOS devices, you should first create a certificate signing request (CSR) file through Keychain Access on your Mac.- Open the Keychain Access from the utility folder, go to Keychain Access > Certificate Assistant > Request a Certificate From a Certificate Authority, and then click.
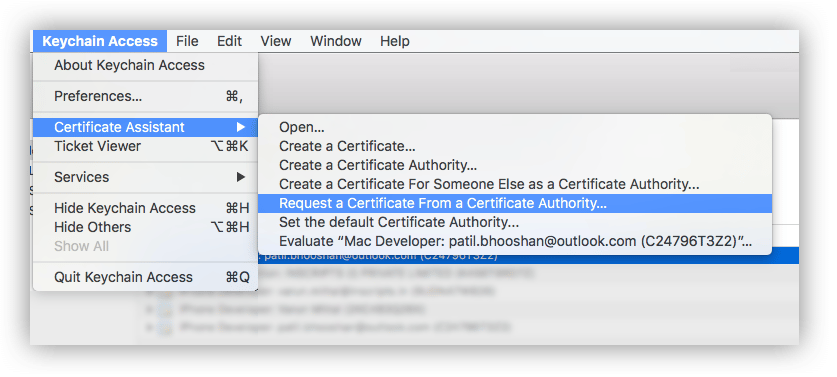
- The Certificate Information dialog box appears. Enter the email address that you use in your Apple Developer account, and enter a common name for your private key. Don’t enter CA email address, choose Saved to disk, and then click the Continue button.
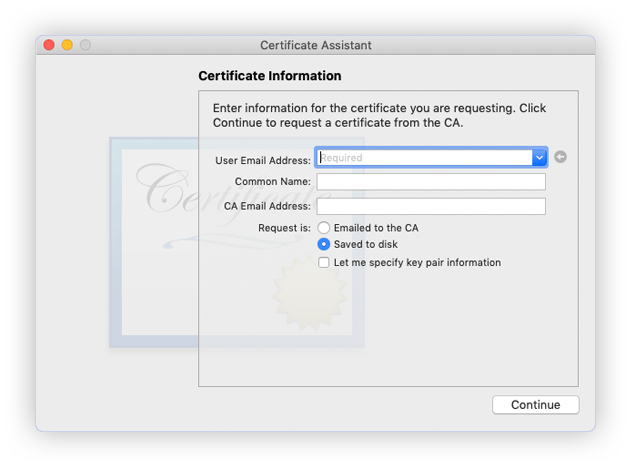
- Specify the name of your CSR to save and choose the location to save the file on your local disk. Then your CSR file is created, which contains a public/private key pair.
Step 2: Create an SSL certificate
- Sign in to your account at the Apple Developer Member Center.
- Go to Certificates, Identifiers & Profiles. In the Identifiers > App IDs and select the Push Notifications service under Application Services
- Click the Edit button.
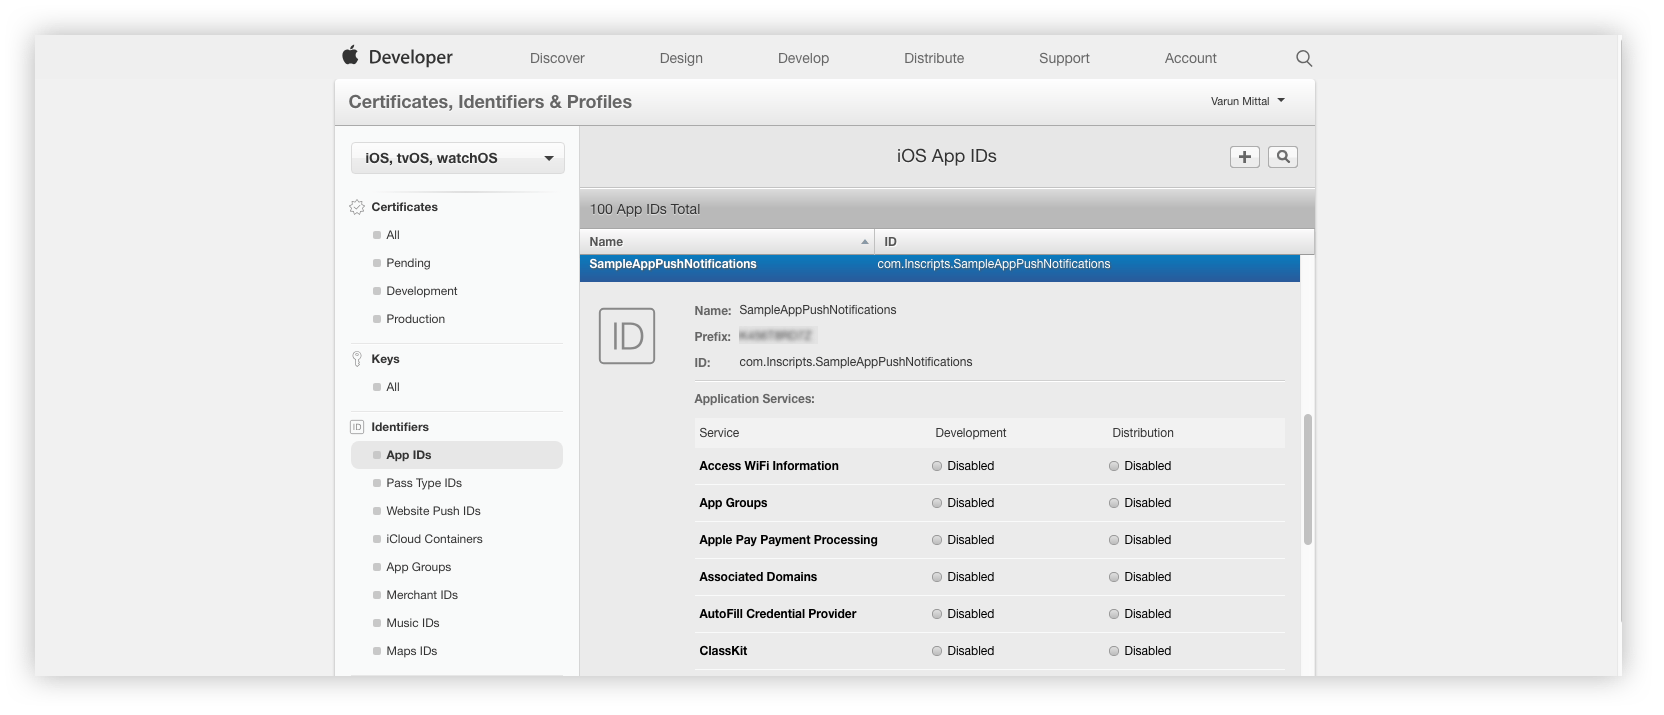
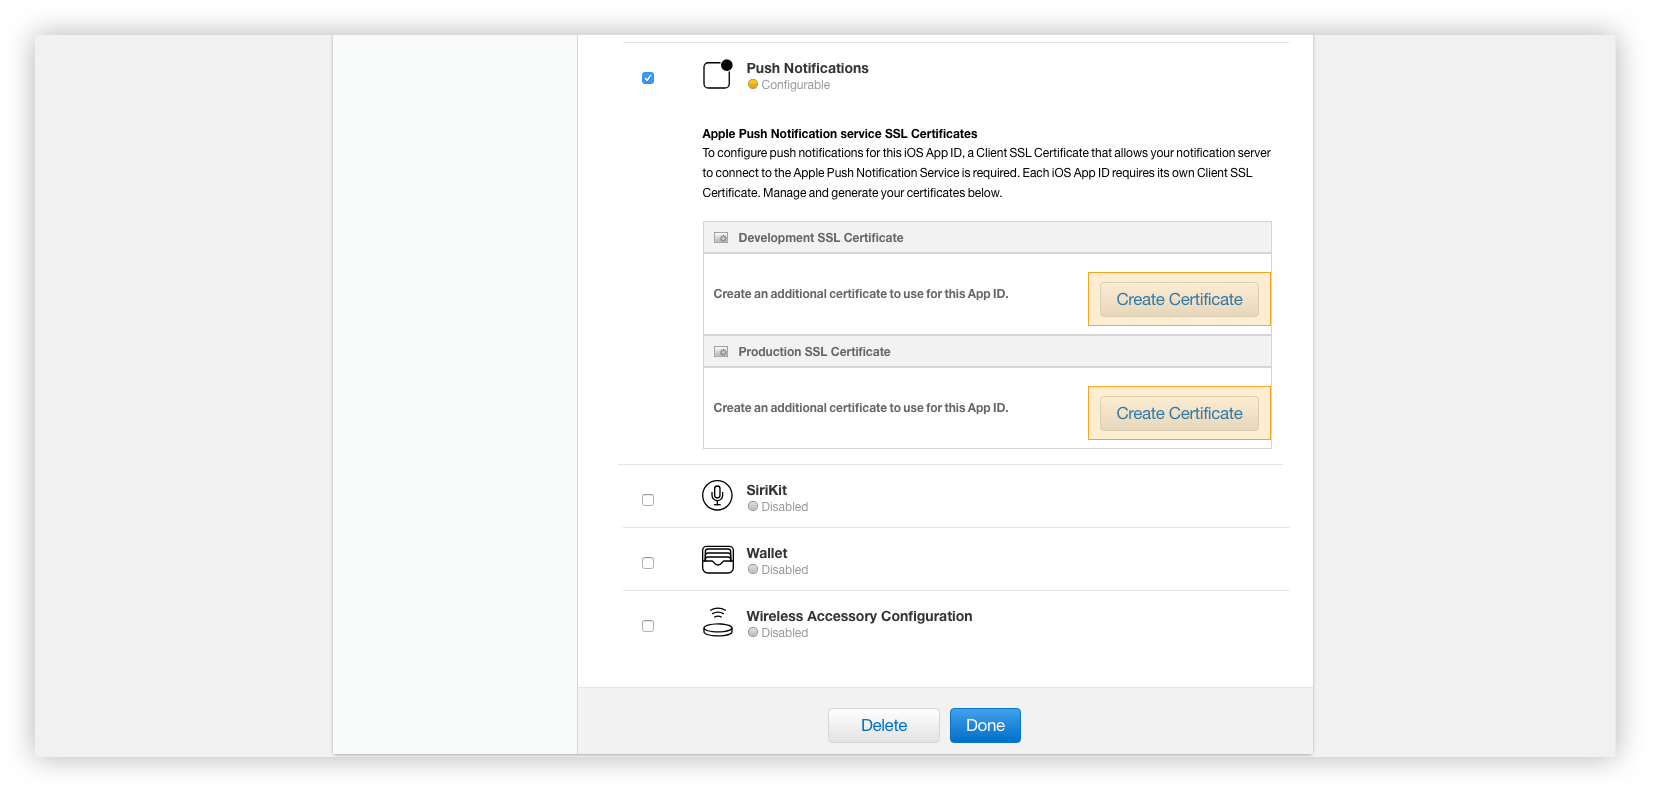
- Under the Push Notifications service, choose which SSL certificate to create either Development or Production.
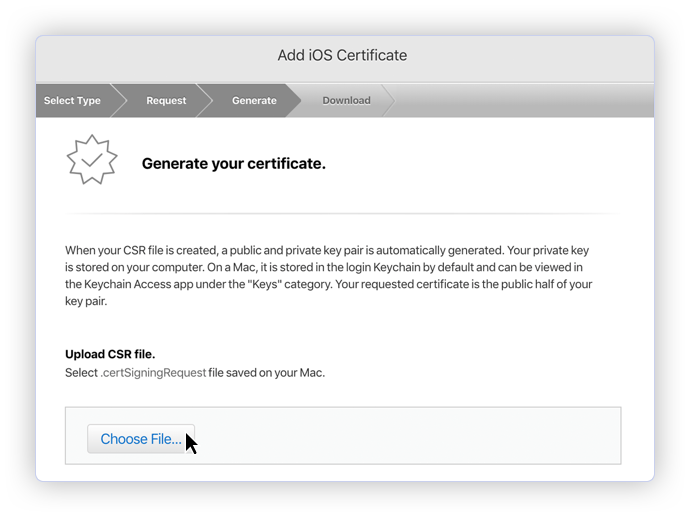
- In the Generate your certificate pane that appears after the selection, under Upload CSR file., upload the CSR file you created through the Choose File… button. To complete the process, choose Continue. When the certificate is ready, choose Download to save it to your Mac.
- In order to install the downloaded certificate to the KeyChain Access on your Mac, double-click it. You can find the certificate in the KeyChain Access > login > Certificates.
Step 3: Export and update .p12 file to Firebase
- Type a name for the .p12 file and save it to your Mac.
- Browse to the location where you saved your key, select it, and click Open. Add the key ID for the key (available in Certificates, Identifiers & Profiles in the Apple Developer Member Center) and export it.
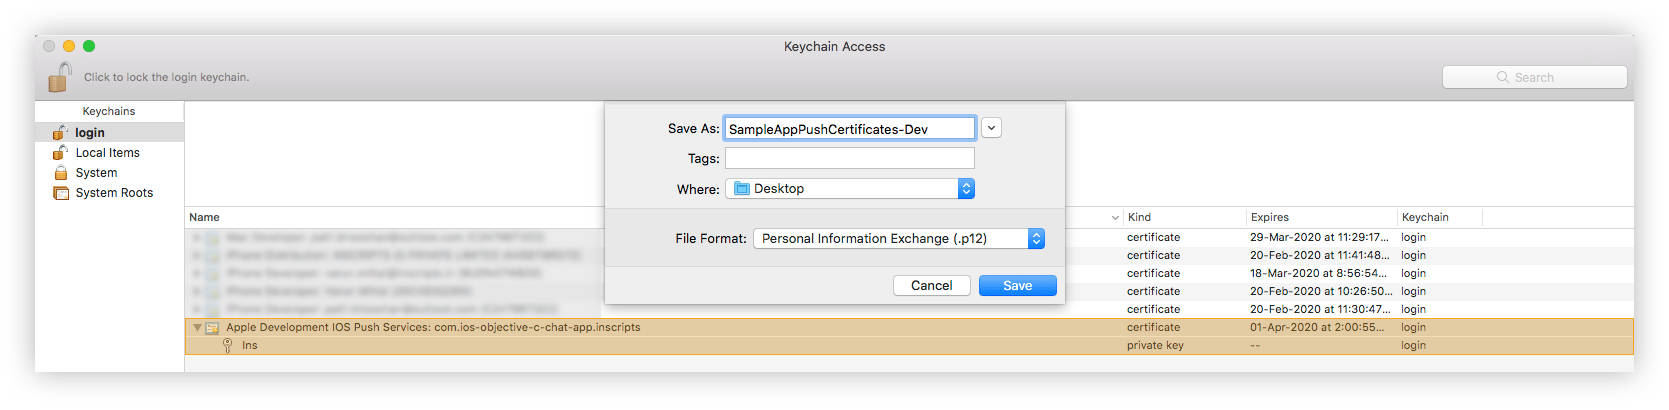
Step 4: Upload your APNs Certificates
- Go to Firebase console and open your project.
- Inside your iOS project in the Firebase console, select settings and then select the
Cloud Messagingtab. - Scroll down to iOS app configuration, click the Upload button for APNS certificate.
- Browse to the location where you saved your APNs Certificates, select it, and click Open.
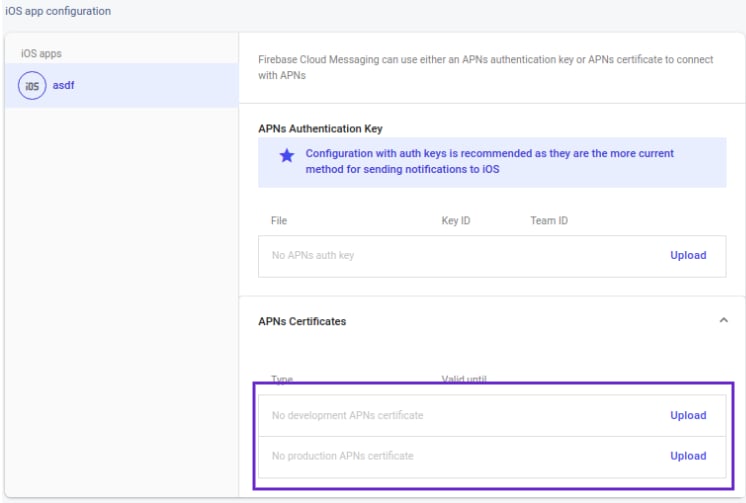
iOS App Setup
Step 1: Initial Firebase Cloud Messaging client setup
- Add the Firebase SDK, Add the firebase pods that you want to install. You can include a Pod in your Podfile like this:
- Swift
- Import the Firebase module in your
ApplicationDelegate:
- Swift
- Objective C
- Configure a FirebaseApp shared instance, typically in your application’s
application:didFinishLaunchingWithOptions: method:
- Swift
- Objective C
Step 2: Register the FCM Token
- Get the FCM Token for remote notifications, typically in your application’s
application:didFinishLaunchingWithOptions: method:
- Swift
- Objective C
- Swift
- Objective C
- Register the FCM token with our Push Notifications extension on success of CometChat.login
- Swift
- This also needs to be done when you refresh your FCM Token
- Swift
Step 3: Start receiving Push Notifications
- Receive remote notification, typically in your application’s
App Delegate:
- Swift
- Objective C
- Receive Notification for
CustomMessage:
CustomMessage, the developer needs to set metadata while sending the CustomMessage value as follows:
- Swift
- Objective C
- Text message
- Media message
Advanced
Convert Push Notification payload to Message object
CometChat SDK provides a methodCometChat.CometChatHelper.processMessage() which will take the JSON received in The push notification as input, and return the corresponding TextMessage, MediaMessage,CustomMessage or Call object in return. Once the message object is received, you can use the entity as per your requirements.
This code needs to be added to the willPresent notification method of the UNUserNotificationCenterDelegate delegate.
- Swift
Miscellaneous
iOS APNs
Apple Push Notification service or APNs is used to send notifications to iOS devices. With this, you can also use Apple’s CallKit for showing the call screen.I want to checkout the sample app
iOS Push notifications sample appView on Github
Get APNS Credentials
The following steps in this section are written on the assumption that you already have an app ID assigned to your client app.Step 1: Create a Certificate Signing Request
To obtain a signing certificate required to sign apps for installation on iOS devices, you should first create a certificate signing request (CSR) file through Keychain Access on your Mac.- Open the Keychain Access from the utility folder, go to Keychain Access > Certificate Assistant > Request a Certificate From a Certificate Authority, and then click.
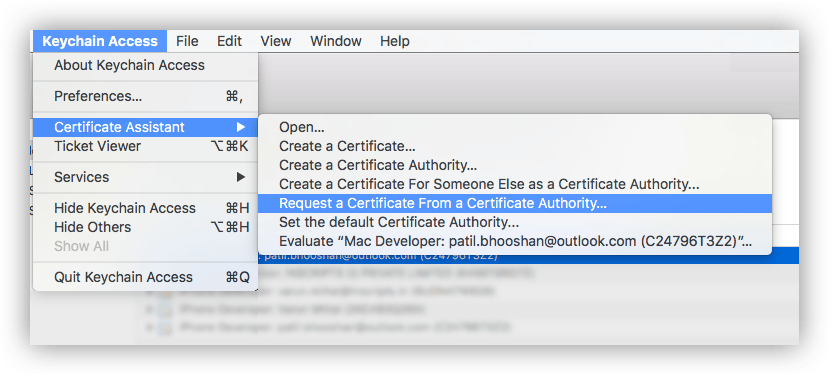
- The Certificate Information dialog box appears. Enter the email address that you use in your Apple Developer account, and enter a common name for your private key. Don’t enter CA email address, choose Saved to disk, and then click the Continue button.
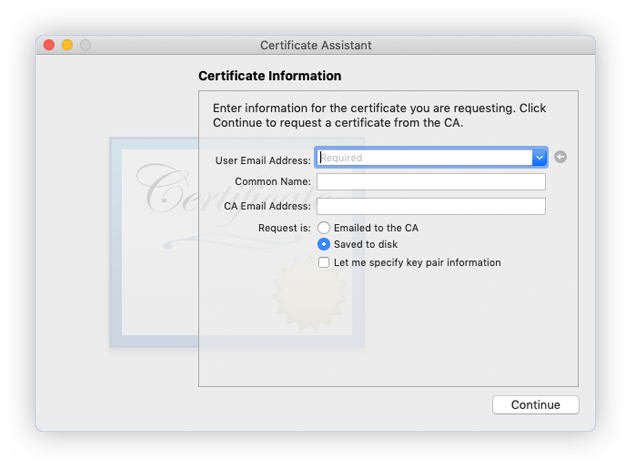
- Specify the name of your CSR to save and choose the location to save the file on your local disk. Then your CSR file is created, which contains a public/private key pair.
Step 2: Create an SSL certificate
- Sign in to your account at the Apple Developer Member Center.
- Go to Certificates, Identifiers & Profiles.
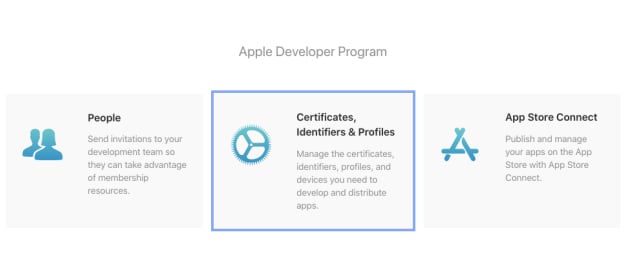
- Create new Certificate by clicking on the + icon.
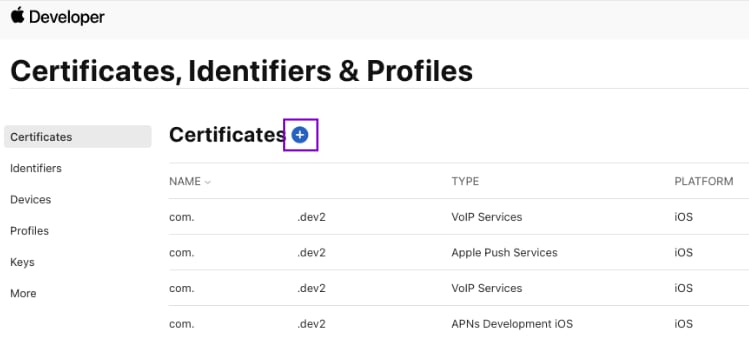
- Under Services, select - Apple Push Notification services SSL (Sandbox & Production)
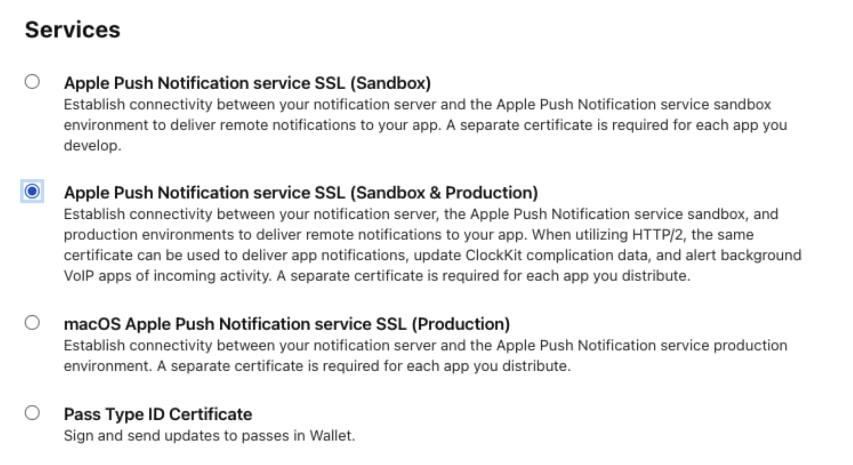
- Select your App ID from the dropdown.
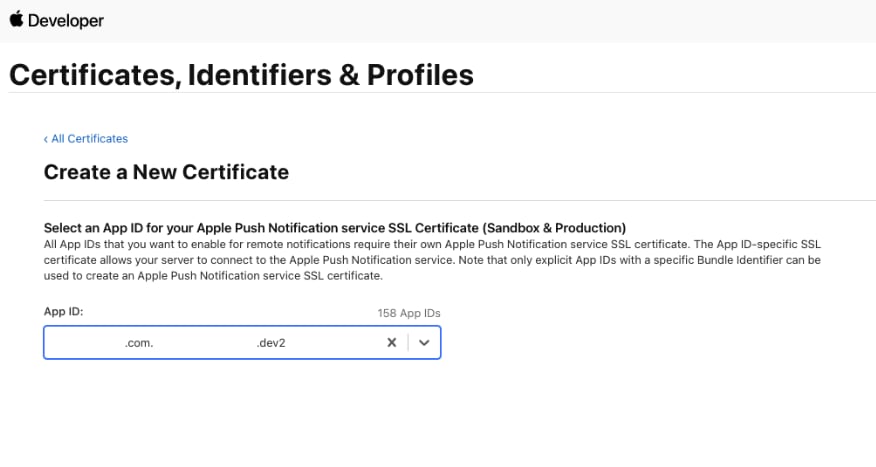
- Upload CSR file., upload the CSR file you created through the Choose File button. To complete the process, choose Continue. When the certificate is ready, choose Download to save it to your Mac.
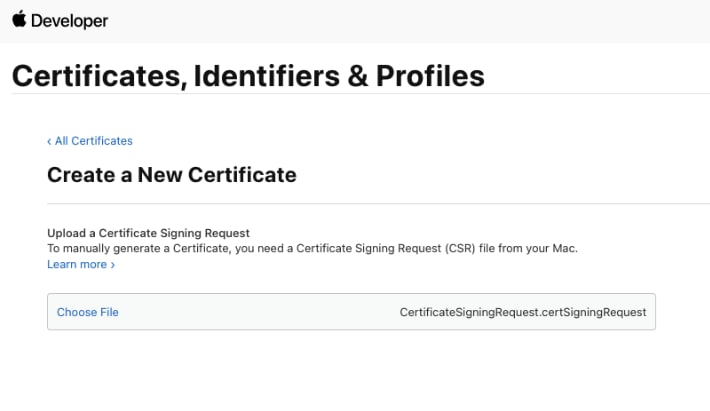
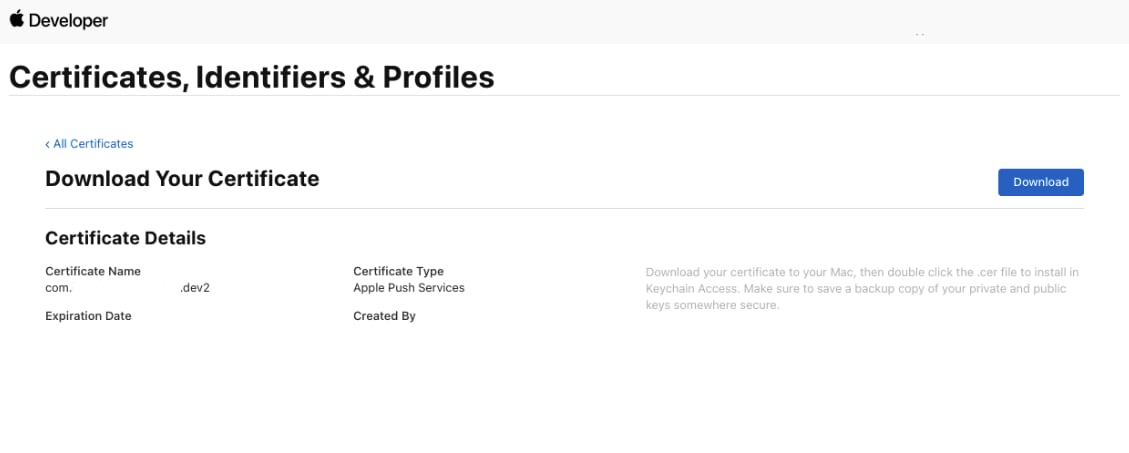
Step 3: Export and update .p8 certificate
- To generate a .p8 key file, go to Apple Developer Account, then select Certificates, IDs & Profiles.
- Select Keys and click on the ”+” button to add a new key.
- In the new key page, type in your key name and check the Apple Push Notification service (APNs) box, then click “Continue” and click “Register”.
- Then proceed to download the key file by clicking Download.
- Make note of the
Key ID,Team IDand yourBundle IDfor saving in the Extension’s settings.
- Type a name for the .p12 file and save it to your Mac.
- Browse to the location where you saved your key, select it, and click Open. Add the key ID for the key (available in Certificates, Identifiers & Profiles in the Apple Developer Member Center) and export it.
- DO NOT provide an export password when prompted.
- The .p12 file will be required in the next step for uploading in the CometChat Dashboard.
Extension settings
Step 1: Enable the extension
- Login to CometChat and select your app.
- Go to the Extensions section and Enable the Push Notifications extension.
- Open the settings for this extension and save the following.
Step 2: Save your settings
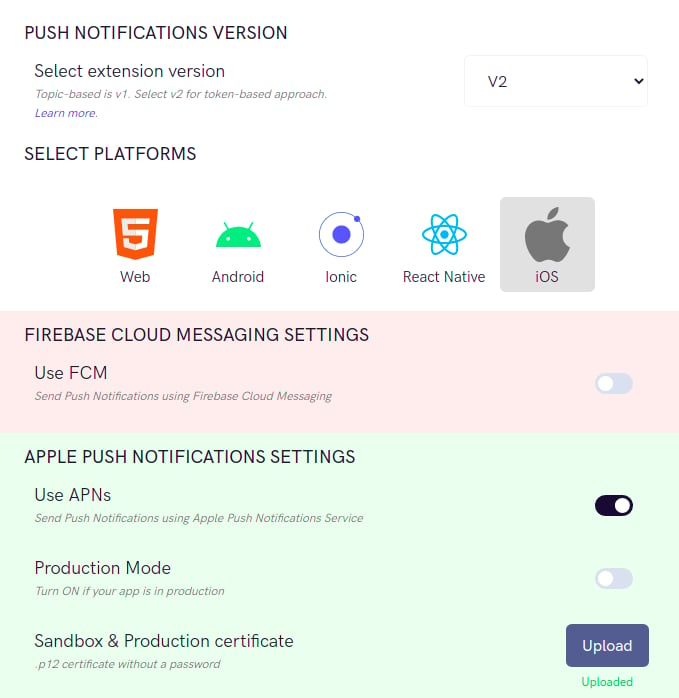
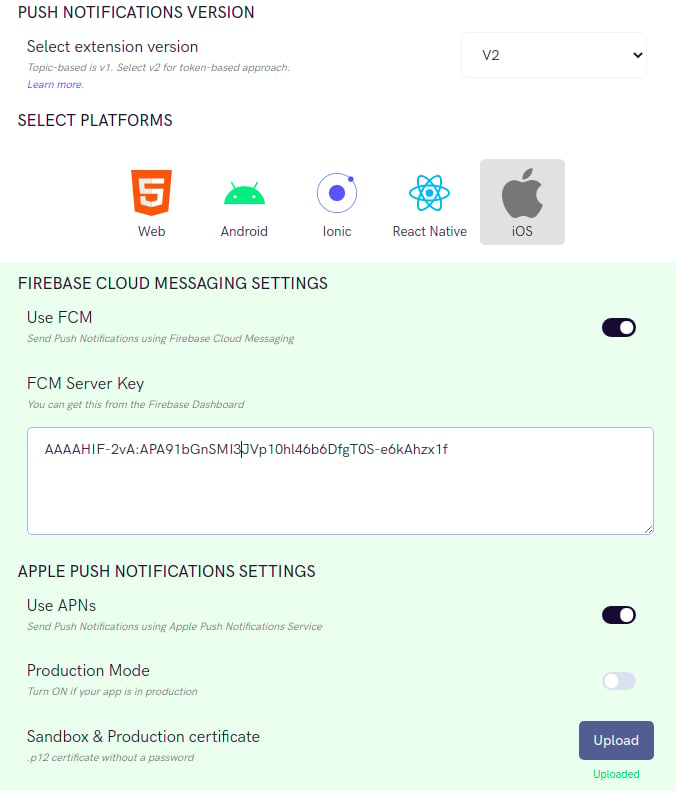
-
Set extension version
- The extension version has to be set to ‘V2’ or ‘V1 & V2’ in order to use APNs as the provider.
-
Select Platforms
- You can select the platforms on which you wish to receive Push Notifications.
-
APNs Settings
- You can turn off the Production mode when you create a development build of your application.
- Upload the .p8 or .p12 certificate exported in the previous step.
- Push payload message options
- The message metadata includes the outputs of the Thumbnail Generation, Image Moderation, and Smart Replies extensions. You may want to retain this metadata if you need to customize the notification displayed to the end user based on these outputs.
-
Notification Triggers
-
Select the triggers for sending Push Notifications. These triggers can be classified into 3 main categories:
- Message Notifications
- Call Notifications
- Group Notifications
- These are pretty self-explanatory and you can toggle them as per your requirement.
-
Select the triggers for sending Push Notifications. These triggers can be classified into 3 main categories:
iOS App Setup
Initial Setup
- Call
CometChat.init()method to initialize CometChat in your application. This needs to be called only once. - The user has to be logged in using
CometChat.login()method. On the success callback, register the token with the extension. Two tokens need to be registered, out of which one is APNs token and other is CallKit token: a.CometChat.registerTokenForPushNotification(token: apnsToken, settings: ["voip":false])
b.CometChat.registerTokenForPushNotification(token: voipToken, settings: ["voip":true])
- Swift
- Import PushKit and CallKit in AppDelegate.Swift file.
- Swift
Receive Push Notifications
- Registering for the APNs notifications
- Swift
- Add AppDelegate extension for receiving Push Notifications
- Swift
- Add AppDelegate extension for VOIP notifications. Launch CallKit screen when the VOIP notification is received. Once the CallKit screen is displayed, you can Accept or Reject the CometChat call accordingly.
- Swift
Miscellaneous
Create view controller for Calls
Create a viewController which will start the call when the user starts the call.- Swift
Convert Push Notification payload to Message object
CometChat SDK provides a methodCometChat.CometChatHelper.processMessage() which will take the JSON received in The push notification as input, and return the corresponding TextMessage, MediaMessage,CustomMessage or Call object in return. Once the message object is received, you can use the entity as per your requirements.
This code needs to be added to the willPresent notification method of the UNUserNotificationCenterDelegate delegate.
- Swift
Flutter
Learn how to implement Push notifications for the Flutter platform using FCM as well as APNs. This document guides you to set up Flutter push notifications as follows:- Using FCM to implement push notifications for messaging on Android and iOS.
- Using APN to implement push notifications for messaging on iOS.
Flutter Push notifications supportPush Notifications are supported in Flutter for CometChat SDK v3.0.9 and above.
FCM: Push notifications for messaging on Android and iOS
For Push notifications from FCM to work on both Android and iOS, the push payload has to be of typeNotification message.
A Notification message is a push payload that has the notification key in it. These push notifications are handled directly by the OS and as a developer, you cannot customize these notifications.
This simple setup can be used for apps that only implement messaging feature of CometChat.
Learn more about FCM messages.
I want to checkout the sample app
Flutter Push notifications sample appImplementation using FCM for Android and iOS.View on Github
Step 1: Install packages
Add the following to your pubspec.yaml file under dependencies.- pubspec.yaml
- Command
Step 2: Configure with flutterfire_cli
Use the following command to installflutterfire_cli
- Command
- Command
android and ios.
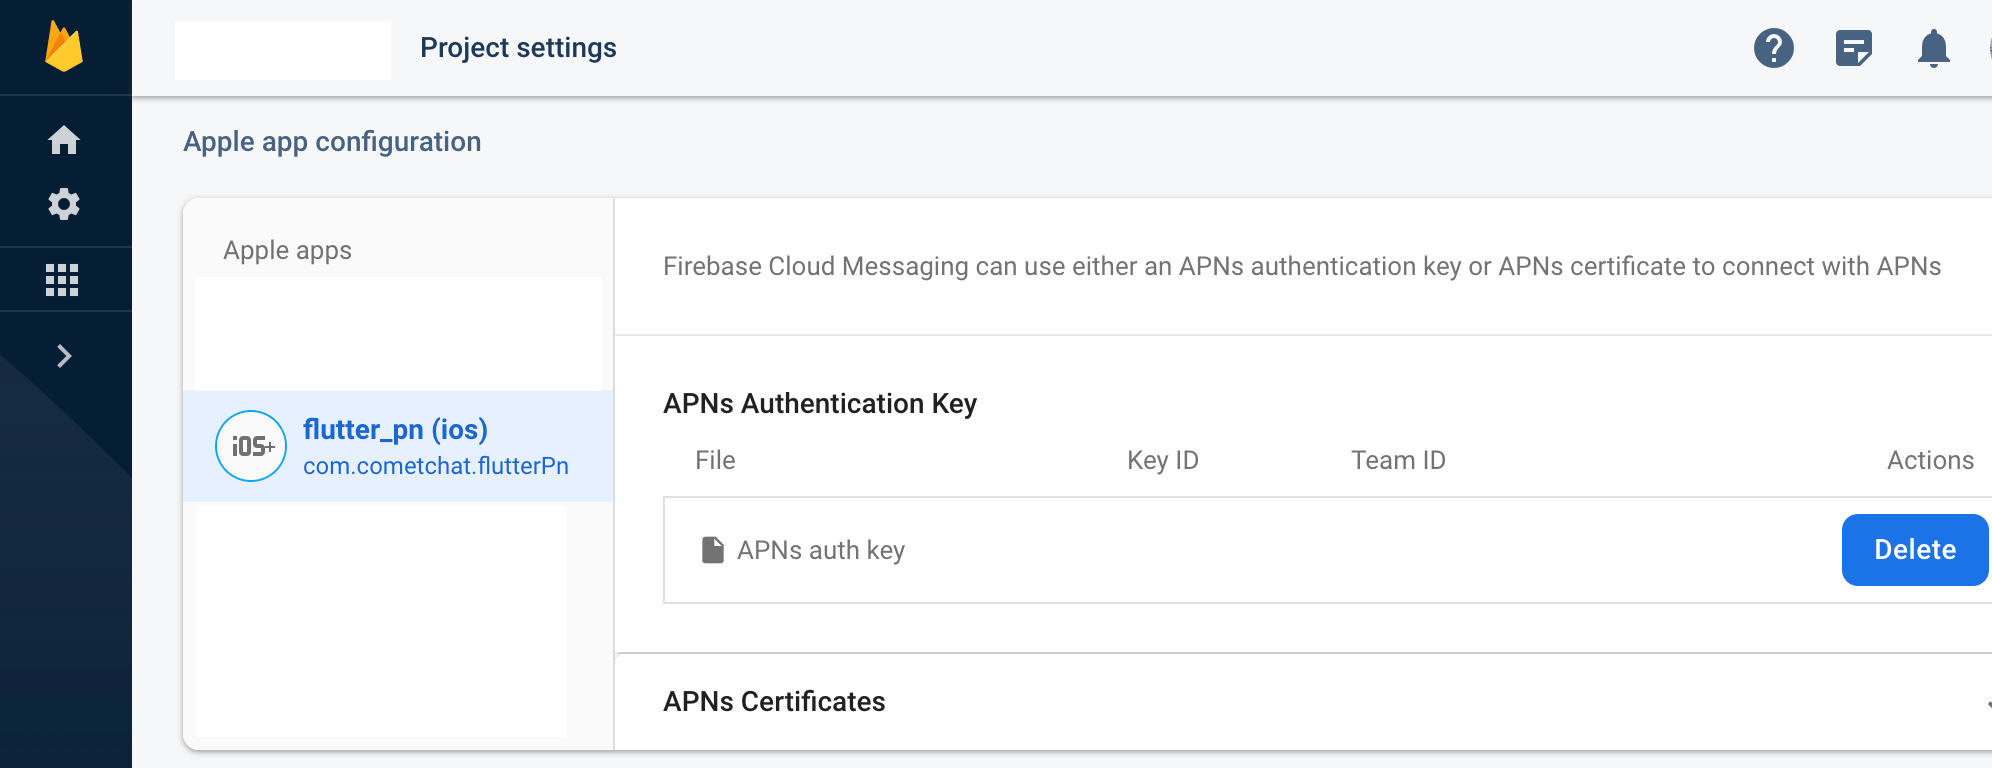
The CLI tool will add the following files to your directory structure:
google-services.jsonto the android folder.GoogleService-Info.plistto the ios folder.firebase_options.dartto thelibfolder.
- Groovy
Step 3: FCM setup in app
This requires you to first set up a global context. It will help you in opening your app once your notification is tapped. Using this global context, you can write a function to navigate to the screen of choice once the notification is tapped.- Dart
- Write a top-level function that is outside of any call. This function will handle the notifications when the app is not in the foreground.
- Initialize firebase with the FirebaseOptions from the previous step.
- Get an instance of firebase messaging
- Request permissions
-
Set up listeners once the permission is granted:
- Background notification listener
- Refreshed token listener that records the FCM token with the extension.
- Notification tap listeners for background and terminated states of the app.
- Make a call to save the FCM token with the extension.
Step 4: Setup for iOS
- Open the project in XCode (
ios/Runner.xcworkspace) - Add Push notifications capability.
- Add Background execution capability with Background fetch & Remote notification enabled.
- Inside the
iosfolder, executepod install.
Step 5: Run your application
Running the app in profile mode for iOS enables you to see the working once the app is terminated.- Command on Android
- Command on iOS
Step 6: Extension setup (FCM)
- Login to CometChat dashboard.
- Go to the extensions section.
- Enable the Push notifications extension.
- Click on the settings icon to open the settings.
- Upload the service account file that is available on the Firebase Console.
- Make sure that you are including the
notificationkey in the payload. Otherwise, this won’t work. - Push payload message options
APN: Push notifications for messaging on iOS
Apple Push Notifications service or APNs is only available for Apple devices. This will not work on Android devices. This setup ensures that the Push notifications for CometChat messages is sent using APNsdevice token.
I want to checkout the sample app
Flutter Push notifications sample appImplementation using APNs for iOS.View on Github
Step 1: Install dependencies
Add the following to your pubspec.yaml file under dependencies.- pubspec.yaml
Step 2: Add capabilities
- Open the project in XCode (
ios/Runner.xcworkspace) - Add Push notifications capability.
- Add Background modes capability with:
- Remote notifications
Step 3: Update AppDelegate.swift
Add the below to your AppDeletegate.swift file.- Swift
Step 4: APN setup in app
Setup a global context to be able to open your app to a specific screen if the notification is tapped. Using the global context, write a function to navigate to the screen of your choice:- Dart
Step 5: Run on a device
Run your app on a real device as Push notifications don’t work on emulators. Use the profile mode to see the behavior when the app is in the background or terminated states.- Command on iOS
Step 6: Extension setup (APN)
- Login to CometChat dashboard.
- Go to the extensions section.
- Enable the Push notifications extension.
- Click on the settings icon to open the settings.
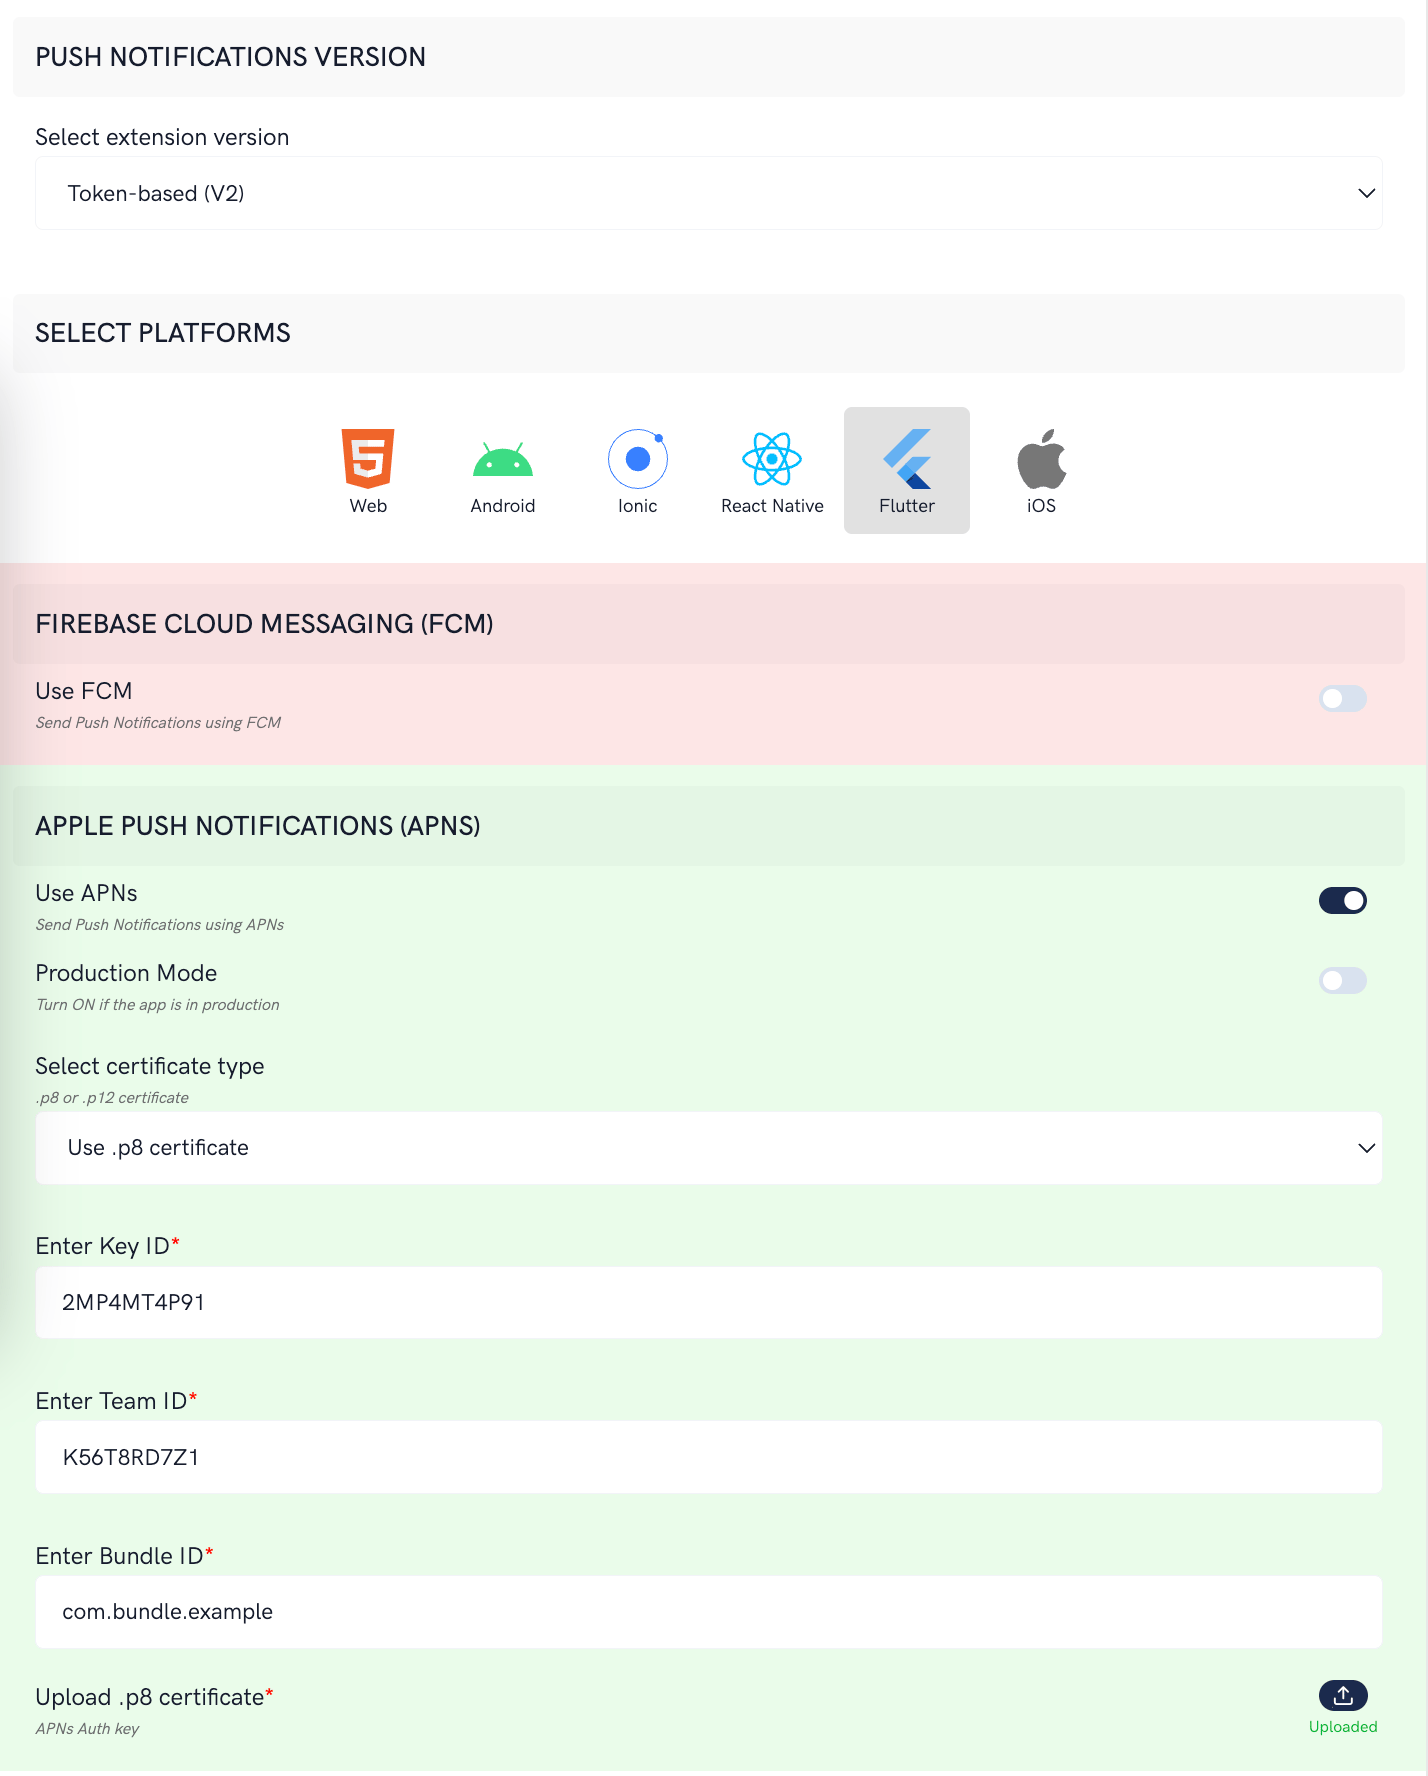
- Save the Team ID, Key ID, Bundle ID and upload the p8 certificate obtained from Apple Developer console.
- Push payload message options
- The message metadata includes the outputs of the Thumbnail Generation, Image Moderation, and Smart Replies extensions. You may want to retain this metadata if you need to customize the notification displayed to the end user based on these outputs.
- Save the settings.
React Native
Learn how to set up Push notifications for React Native using Firebase Cloud Messaging or FCM.I want to checkout the sample app
React Native Push notifications sample appView on Github
Firebase Project Setup
Visit Firebase and login/signup using your Gmail ID.Step 1: Create a new Firebase Project
Head over to the Firebase Console to create a new project.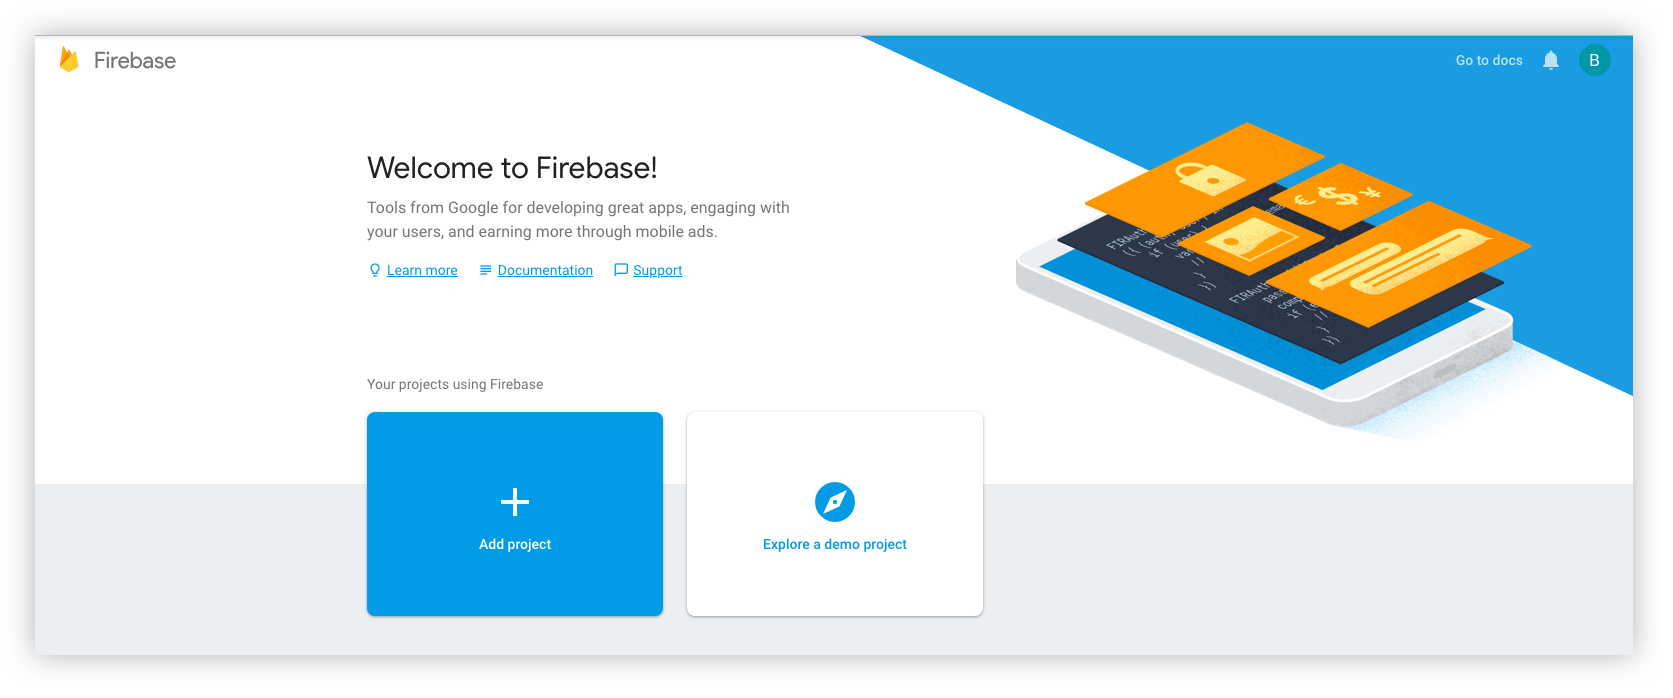
- You give a name to your project
- Add Google Analytics to your project (Optional)
- Configure Google Analytics account (Optional)
Step 2: Add Firebase to your App
React native setup will require 2 files for Android and iOS:- For Android, you need to download the google-services.json file from the Firebase console.
- For iOS, you need to download the GoogleService-Info.plist file from the Firebase console.
Step 3: Download the service account file
Extension settings
Step 1: Enable the extension
- Login to CometChat and select your app.
- Go to the Extensions section and Enable the Push Notifications extension.
- Open up the settings and save the following settings.
Step 2: Save your settings
On the Settings page you need to enter the following:- Set extension version
- If you are setting it for the first time, Select
V2to start using the token-based version of the Push Notification extension. - If you already have an app using
V1and want to migrate your app to useV2, then SelectV1 & V2option. This ensures that the users viewing the older version of your app also receive Push Notifications. - Eventually, when all your users are on the latest version of your app, you can change this option to
V2, thus turning offV1(Topic-based) Push Notifications completely.
- Select the platforms that you want to support
- Select from Web, Android, Ionic (Deprecated), React Native, Flutter & iOS.
- Notification payload settings
- You can control if the notification key should be in the Payload or not. Learn more about the FCM Messages here.
- Push payload message options
- The message metadata includes the outputs of the Thumbnail Generation, Image Moderation, and Smart Replies extensions. You may want to retain this metadata if you need to customize the notification displayed to the end user based on these outputs.
- Notification Triggers
-
Select the triggers for sending Push Notifications. These triggers can be classified into 3 main categories:
- Message Notifications
- Call Notifications
- Group Notifications
- These are pretty self-explanatory and you can toggle them as per your requirement.
App Setup
Step 1: Initial plugin setup
- For React Native, there are numerous plugins available via NPM which can be used to set up push notifications for your apps. react-native-firebase and react-native-notifications are just the two out of many available.
- To setup Push Notification, you need to follow the steps mentioned in the Plugin’s Documentation.
- Two separate apps created on the Firebase console. (For Android and iOS).
- Plugin setup completed as per the respective documentation and our reference.
Step 2: Register FCM Token
- This step assumes that you already have a React Native app setup with CometChat installed. Make sure that the CometChat object is initialized and user has been logged in.
- On the success callback of user login, you can fetch the FCM Token and register it with the extension as shown below:
- JavaScript
- Registration also needs to happen in case of token refresh as shown below:
- JavaScript
Step 3: Receive Notifications
- JavaScript
We send Data Notifications and you need to handle displaying notifications at your end. For eg: Using Notifee
Step 4: Stop receiving Notifications
- Simply logout the CometChat user and you will stop receiving notifications.
- As a good practice, you can also delete the FCM Token by calling
deleteTokenon the messaging object.
- JavaScript
Advanced
Handle Custom Messages
To receive notification ofCustomMessage, you need to set metadata while sending the CustomMessage.
- JavaScript
Converting push notification payload to message object
CometChat SDK provides a methodCometChat.CometChatHelper.processMessage() to convert the message JSON to the corresponding object of TextMessage, MediaMessage,CustomMessage, Action or Call.
- JavaScript
Type of Attachment can be of the following the type
1.
2.
3.
4.
1.
CometChatConstants.MESSAGE_TYPE_IMAGE2.
CometChatConstants.MESSAGE_TYPE_VIDEO3.
CometChatConstants.MESSAGE_TYPE_AUDIO4.
CometChatConstants.MESSAGE_TYPE_FILE- Text message
- Media message
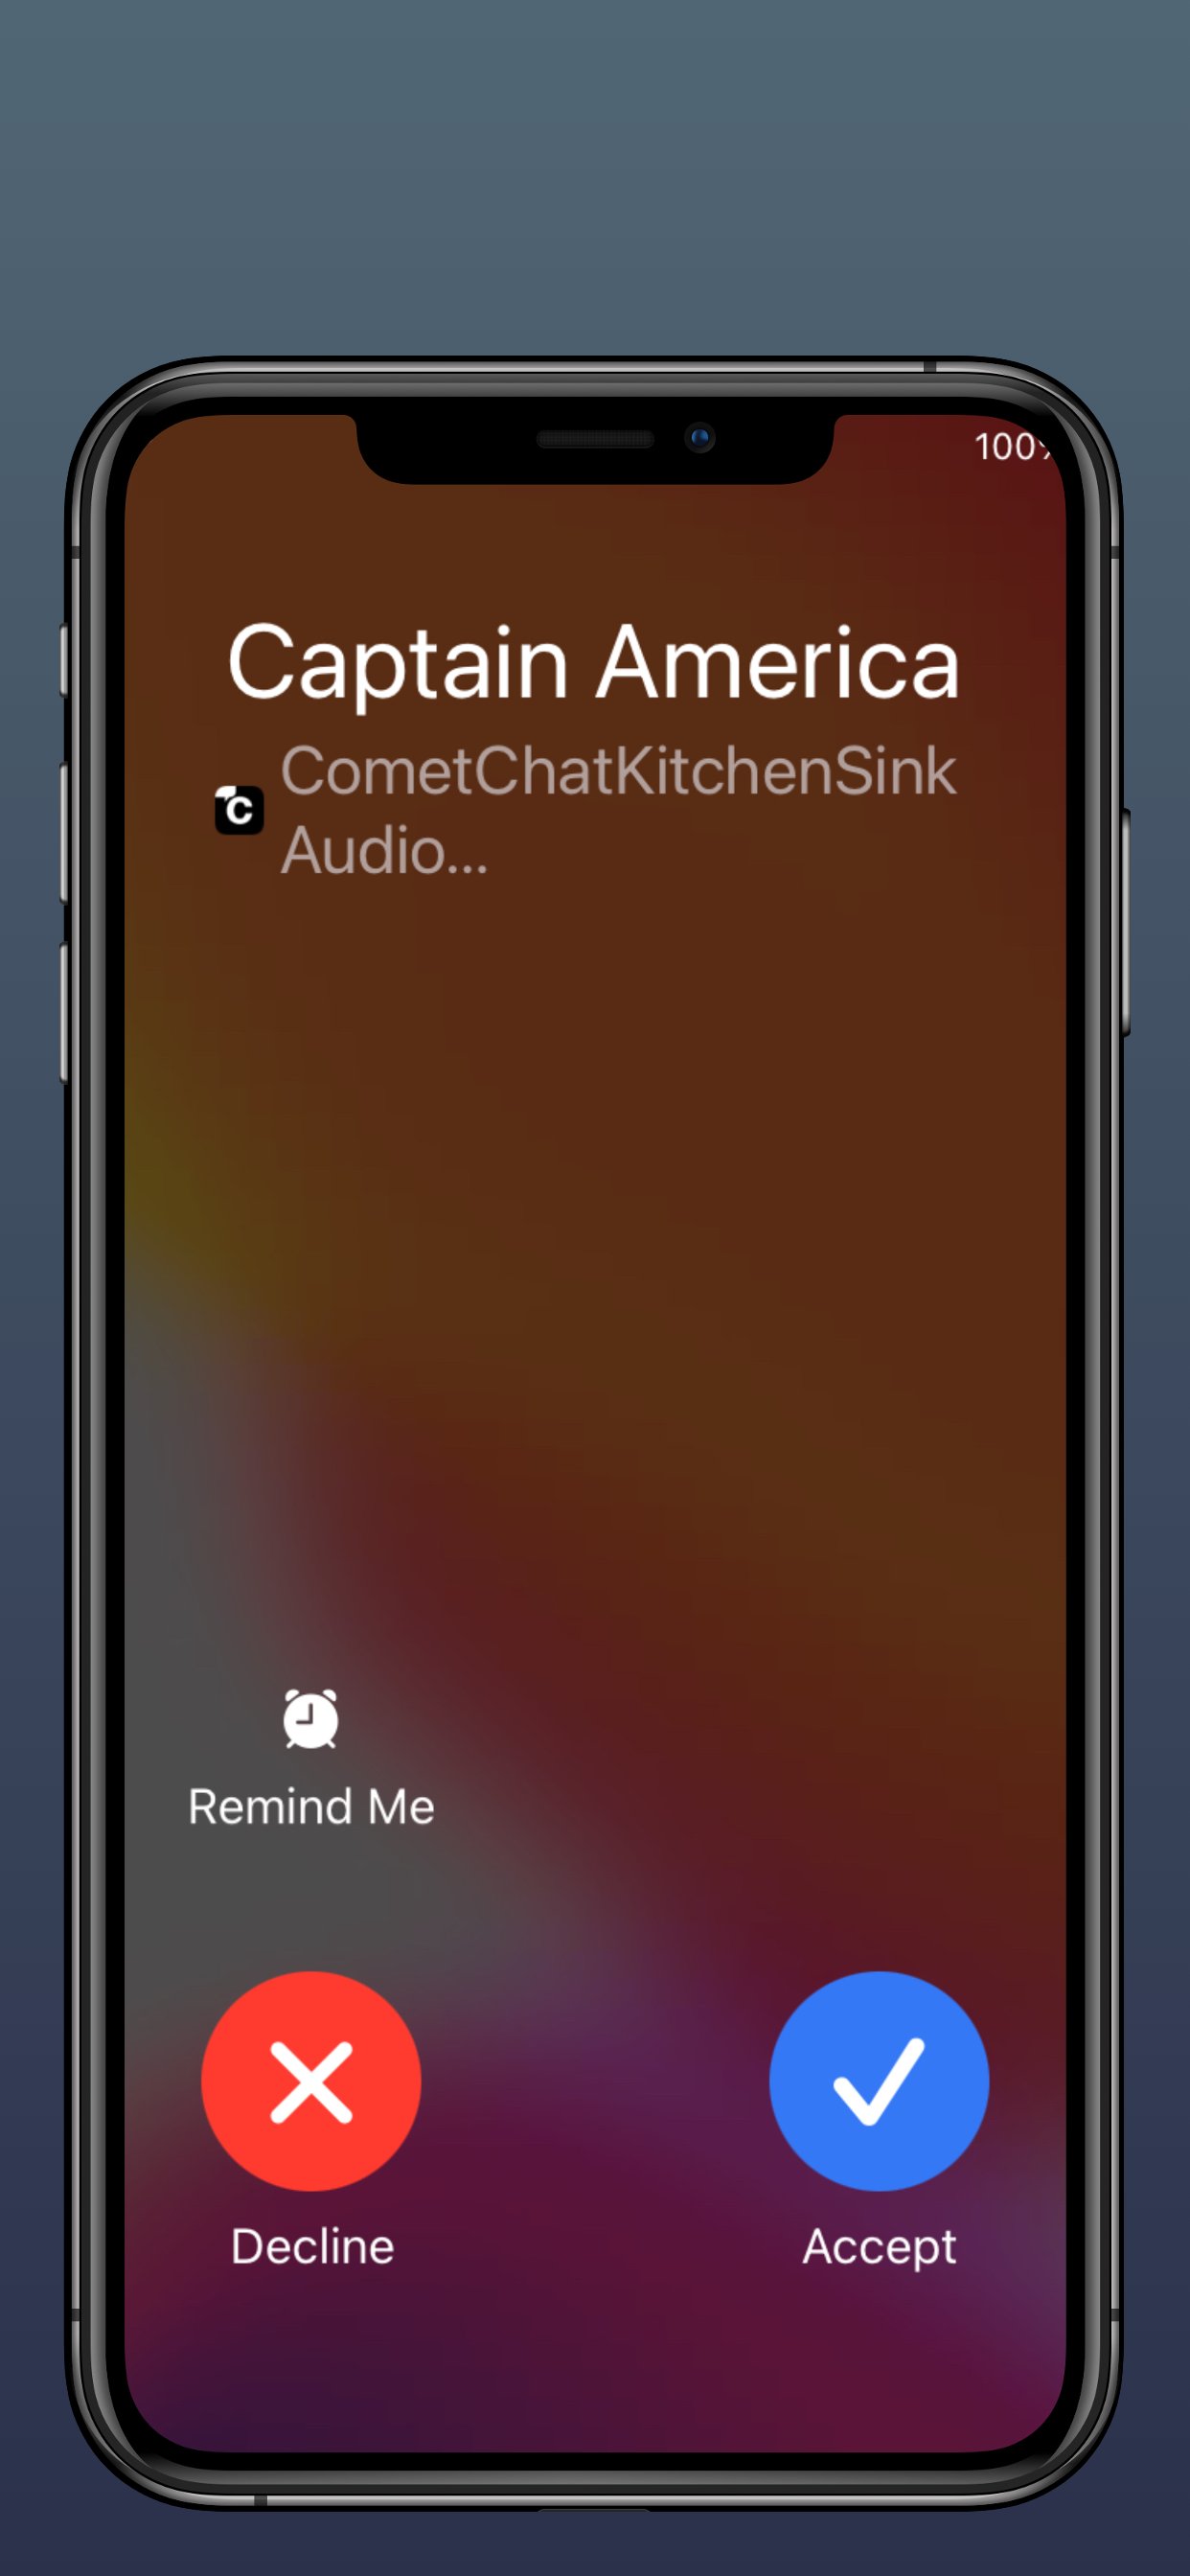
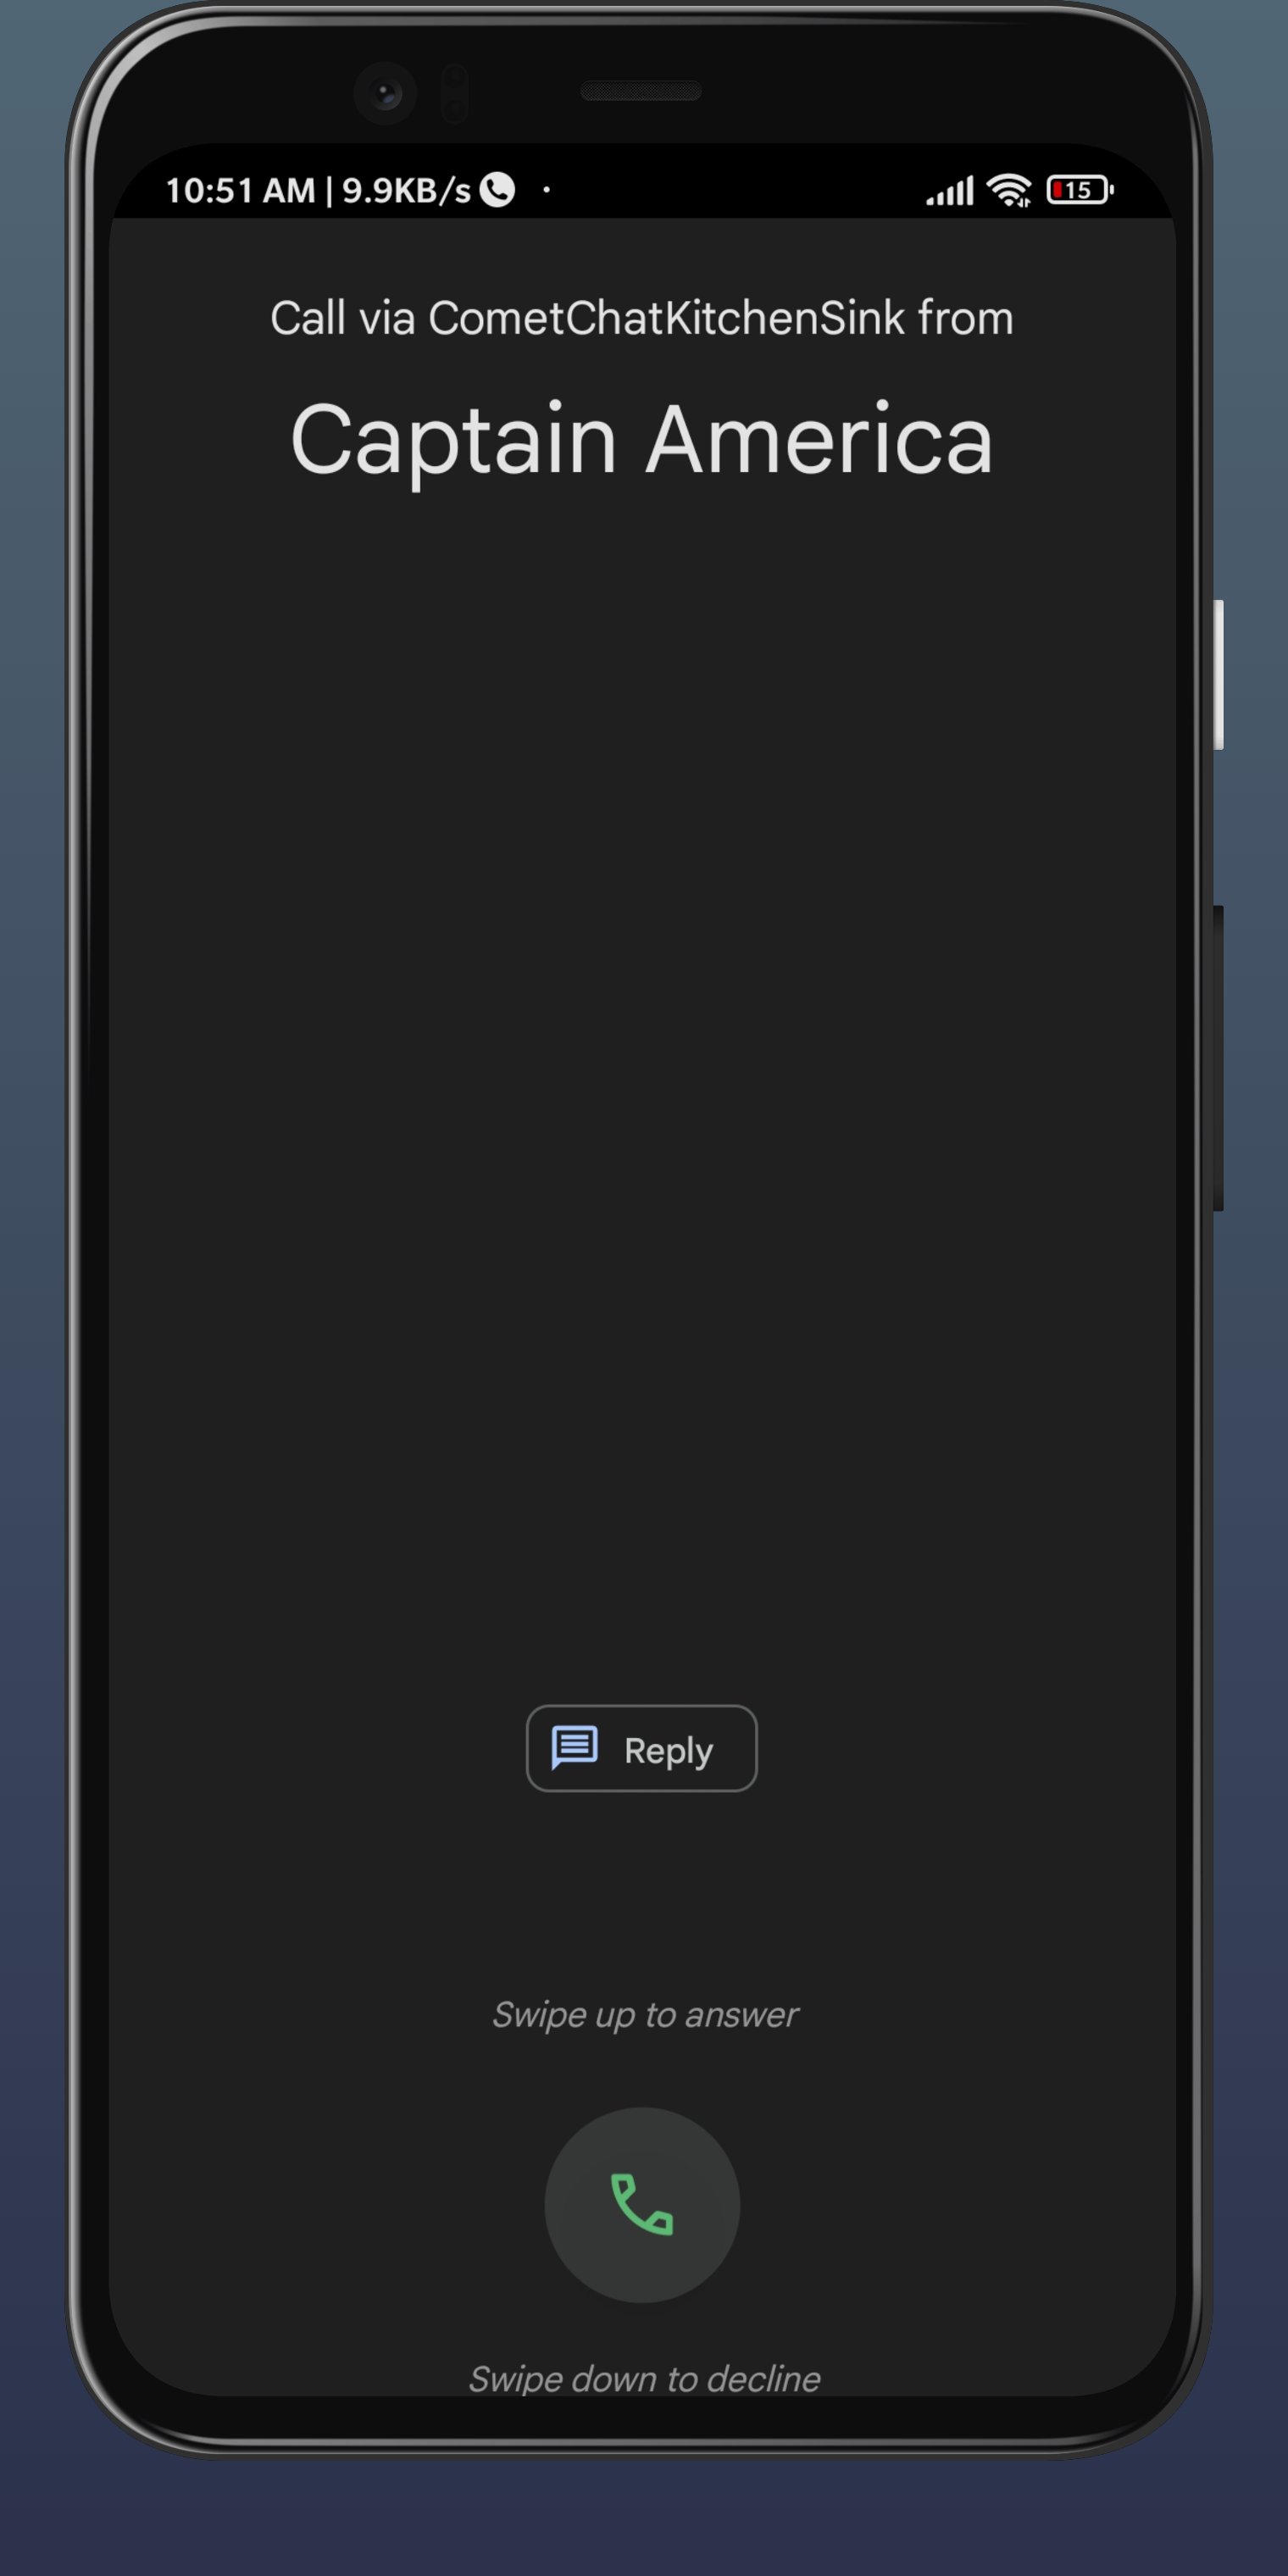
Integrating ConnectionService and CallKit Using CometChat Push Notification
Setup push notification
- Android
- iOS
Step 1: Create a Certificate Signing Request
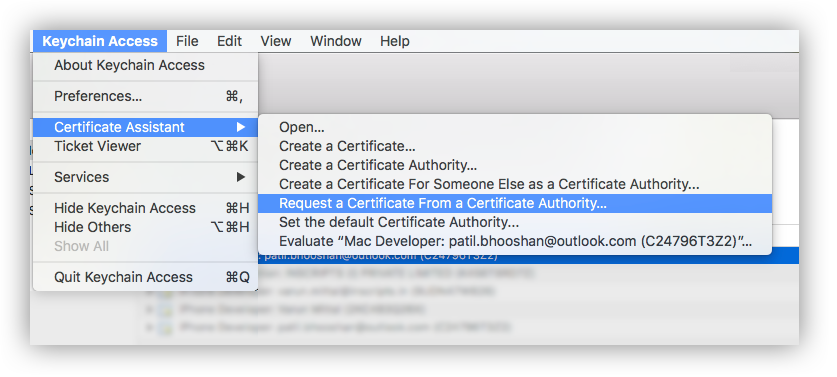
To obtain a signing certificate required to sign apps for installation on iOS devices, you should first create a certificate signing request (CSR) file through Keychain Access on your Mac.- Open the Keychain Access from the utility folder, go to Keychain Access > Certificate Assistant > Request a Certificate From a Certificate Authority, and then click.
- The Certificate Information dialog box appears. Enter the email address that you use in your Apple Developer account, and enter a common name for your private key. Don’t enter CA email address, choose Saved to disk, and then click the Continue button. <img align=“center” src=”./images/step1.2.png”> <br></br>
- Specify the name of your CSR to save and choose the location to save the file on your local disk. Then your CSR file is created, which contains a public/private key pair.
Step 2: Create an SSL certificate
- Sign in to your account at the Apple Developer Member Center.
- Go to Certificates, Identifiers & Profiles.

- Create new Certificate by clicking on the + icon.

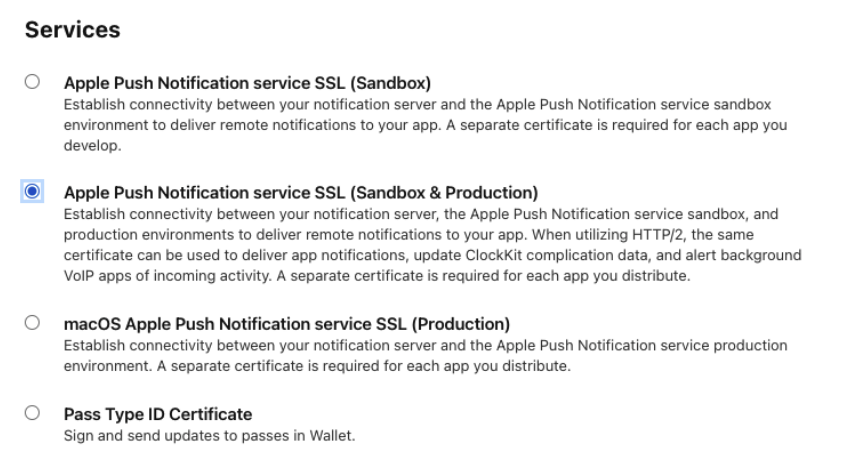
- Under Services, select - Apple Push Notification services SSL (Sandbox & Production)
- Select your App ID from the dropdown.

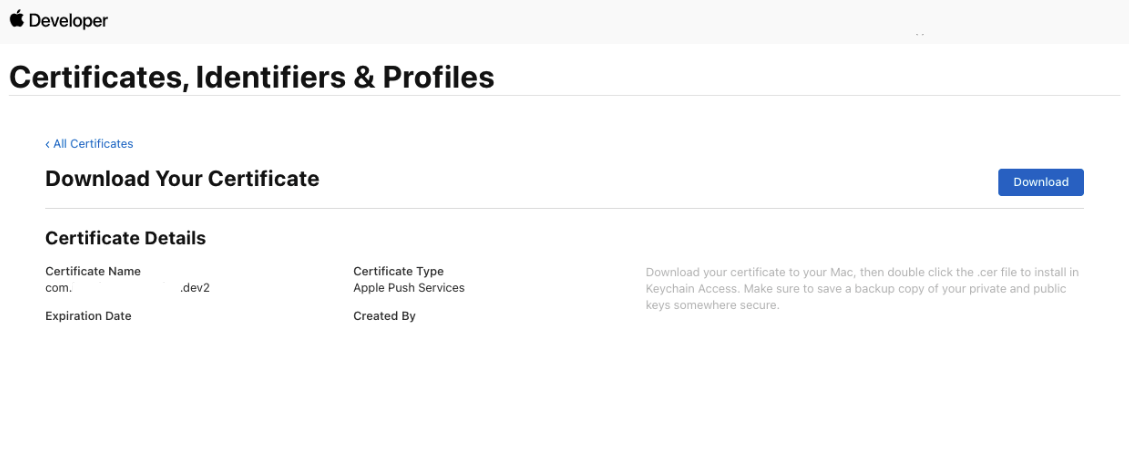
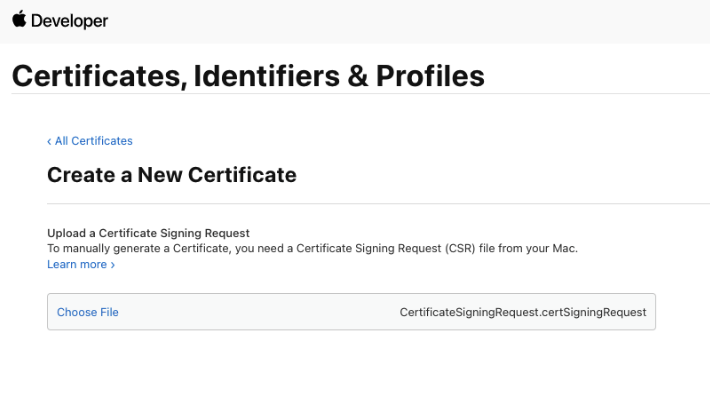
- Upload CSR file., upload the CSR file you created through the Choose File button. To complete the process, choose Continue. When the certificate is ready, choose Download to save it to your Mac.
Step 3: Export and update .p8 certificate
- To generate a .p8 key file, go to Apple Developer Account, then select Certificates, IDs & Profiles.
- Select Keys and click on the ”+” button to add a new key.
- In the new key page, type in your key name and check the Apple Push Notification service (APNs) box, then click “Continue” and click “Register”.
- Then proceed to download the key file by clicking Download.
- Make note of the
Key ID,Team IDand yourBundle IDfor saving in the Extension’s settings.
- Type a name for the .p12 file and save it to your Mac.
- Browse to the location where you saved your key, select it, and click Open. Add the key ID for the key (available in Certificates, Identifiers & Profiles in the Apple Developer Member Center) and export it.
- DO NOT provide an export password when prompted.
- The .p12 file will be required in the next step for uploading in the CometChat Dashboard.
Extension settings
Step 1: Enable the extension
- Login to CometChat and select your app.
- Go to the Extensions section and Enable the Push Notifications extension.
- Open the settings for this extension and save the following.
Step 2: Save your settings
On the Settings page you need to enter the following:- Set extension version The extension version has to be set to ‘V2’ or ‘V1 & V2’ in order to use APNs as the provider.
- Select Platforms You can select the platforms on which you wish to receive Push Notifications.
- Firebase Cloud Messaging Settings This includes the FCM Server key that you can fetch from the Firebase Dashboard.
- APNs Settings You can turn off the Production mode when you create a development build of your application. Upload the .p12 certificate exported in the previous step.
- Push Notifications Title This is usually the name of your app.
-
Notification Triggers
Select the triggers for sending Push Notifications. These triggers can be classified into 3 main categories:
- Message Notifications
- Call Notifications
- Group Notifications
Installation
We need to add two packages for this- React-native-CallKeep
- Bash
- React Native VoIP Push Notification
- Bash
App Setup
First you need to Setup CallKeep at the start of the app in Index.js- JavaScript
- JavaScript
Android
In android we are going to use Firebase push notification to display Call notification So basically when ever we receive a push notification for call we display call notification. we need to add a listener to listen to notification when the app is background or foreground state.- JavaScript
iOS
In iOS we use APNs push and voip push notification to display push notification and display call CallKit for calls. The notification are handled in Native iOS You need to add the code in AppDelegate.m file to display CallKit- Objective C
Capacitor, Cordova & Ionic (Deprecated)
Learn how to setup Push Notifications for Capacitor, Cordova and Ionic framework using Firebase Cloud Messaging or FCM.I want to checkout the sample app
Ionic/Cordova Push notifications sample app (Deprecated)View on Github
Firebase Project Setup
Visit Firebase Console and login/signup using your Gmail ID.Step 1: Create a new Firebase Project
On your Firebase Console, create a new project.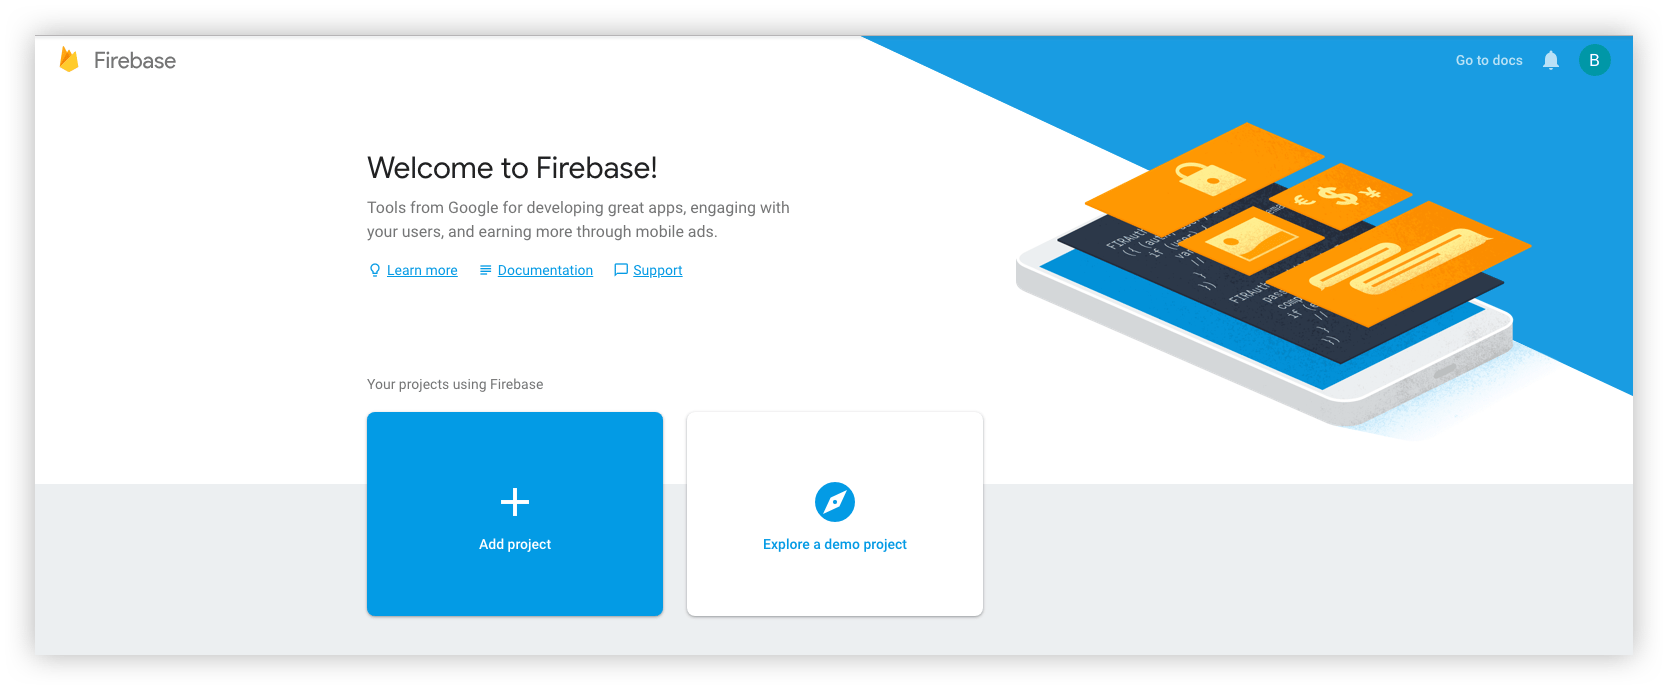
- You give a name to your project
- Add Google Analytics to your project (Optional)
- Configure Google Analytics account (Optional)
Step 2: Add Firebase to your App
React native setup will require 2 files for Android and iOS:- For Android, you need to download the
google-services.jsonfile. You can refer to the Android Firebase Project Setup - Step 2 and resume here once done. - For iOS, you need to download the
GoogleService-Info.plistfile. You can refer to the iOS Firebase Project Setup - Step 2 and resume here once done. - For web, you need to have the Firebase Config object. You can refer to the Web Firebase Project Setup - Step 2 and resume here once done.
Step 3: Download the service account file
Extension settings
Step 1: Enable the extension
- Login to CometChat and select your app.
- Go to the Extensions section and Enable the Push Notifications extension.
- Open the settings for this extension and save the following.
Step 2: Save your settings
On the Settings page you need to enter the following:- Set extension version
- If you are setting it for the first time, Select
V2to start using the token-based version of the Push Notification extension. - If you already have an app using
V1and want to migrate your app to useV2, then SelectV1 & V2option. This ensures that the users viewing the older version of your app also receive Push Notifications. - Eventually, when all your users are on the latest version of your app, you can change this option to
V2, thus turning offV1(Topic-based) Push Notifications completely.
- Select the platforms that you want to support
- Select from Web, Android, Ionic (Deprecated), React Native, Flutter & iOS.
- Notification payload settings
- You can control if the notification key should be in the Payload or not. Learn more about the FCM Messages here.
- Push payload message options
- The message metadata includes the outputs of the Thumbnail Generation, Image Moderation, and Smart Replies extensions. You may want to retain this metadata if you need to customize the notification displayed to the end user based on these outputs.
- Notification Triggers
-
Select the triggers for sending Push Notifications. These triggers can be classified into 3 main categories:
- Message Notifications
- Call Notifications
- Group Notifications
- These are pretty self-explanatory and you can toggle them as per your requirement.
App Setup
Step 1: Initial plugin setup
- For Cordova & Ionic, there are numerous plugins available via NPM which can be used to set up push notifications for your apps like FCM Plugin and Push Plugin.
- To setup Push Notification, you need to follow the steps mentioned in the Plugin’s Documentation.
- Separate apps created on the Firebase console. (For Web, Android and iOS).
- Plugin setup completed as per the respective documentation.
Step 2: Register FCM Token
- This step assumes that you already have a React Native app setup with CometChat installed. Make sure that the CometChat object is initialized and user has been logged in.
- On the success callback of user login, you can fetch the FCM Token and register it with the extension as shown below:
- JavaScript
- Registration also needs to happen in case of token refresh as shown below:
- JavaScript
Step 3: Receive Notifications
- JavaScript
Step 4: Stop receiving Notifications
- On CometChat.logout will stop receiving notifications.
- As a good practice, you can also delete the FCM Token by calling
deleteTokenon the fcm object.
- JavaScript
Advanced
Handle Custom Messages
To receive notification ofCustomMessage, you need to set metadata while sending the CustomMessage.
- JavaScript
Converting push notification payload to message object
CometChat SDK provides a methodCometChat.CometChatHelper.processMessage() to convert the message JSON to the corresponding object of TextMessage, MediaMessage,CustomMessage, Action or Call.
- JavaScript
Type of Attachment can be of the following the type:
CometChatConstants.MESSAGE_TYPE_IMAGECometChatConstants.MESSAGE_TYPE_VIDEOCometChatConstants.MESSAGE_TYPE_AUDIOCometChatConstants.MESSAGE_TYPE_FILE- Text message
- Media message
Mute Functionality
Learn how to enable your users to mute notifications for certain conversations You can silence one-on-one and/or group conversations for a specific amount of time using the Mute functionality. Aside from that, you can include a Push Notifications section in your apps’ settings. Your users can use this feature to turn off Push Notifications for certain chats or to opt-out of receiving Push Notifications altogether.Mute or Unmute Chats
Chat comprises anything related to messages like:- New Message (Text, media, or Custom messages like Polls)
- Edited Message
- Deleted Message
- Response in threads
Mute Chats
You can specify the UIDs and/or GUIDs to be muted. You can mute chats for these conversations for a specific amount of time.
This functionality uses the
callExtension() method provided by CometChat SDK.
- JavaScript
- Java
- Swift
Unmute Chats
Used to unmute the chats for certain conversations before the mentioned time during muting.
This functionality uses the
callExtension() method provided by CometChat SDK.
- JavaScript
- Java
- Swift
Mute or Unmute Calls
You can mute the notifications for one-on-one or group calls. This works for Default calling (video or audio calls) offered by CometChat.Mute Calls
You can specify the UIDs and/or GUIDs to be muted. You can mute calls for these conversations for the said amount of time.
This functionality uses the
callExtension() method provided by CometChat SDK.
- JavaScript
- Java
- Swift
Unmute Calls
Used to unmute calls for certain conversations before the mentioned time during muting.
Used to unmute the calls for certain conversations before the mentioned time during muting.
- JavaScript
- Java
- Swift
User Settings
Apart from the feature to mute/unmute a set of UIDs or GUIDs using the above APIs, apps can have push notifications according to the user settings. The following user settings can be set:Save User Settings
The User settings object needs to be submitted as follows. All the fields are mandatory:- User Settings
callExtension() method provided by CometChat SDK.
- JavaScript
- Java
- Swift
Fetch User Settings
Fetches all the user settings that are saved by the user. This also returns the list of muted UIDs and GUIDs along with the said time for muting. This functionality uses thecallExtension() method provided by CometChat SDK.
- JavaScript
- Java
- Swift
Token Management
Register tokens
Token registration can now be done using the callExtension method provided by the CometChat SDK. The token can be FCM token or APNs token and VoIP token. This can be achieved using the code snippet below: For FCM token:- JavaScript
- Java
- Swift
- JavaScript
- Java
- Swift
Get tokens
This provides a list of all the Push Notifications tokens that have been registered for the current user. The tokens are segregated based on the platform.- JavaScript
- Java
- Swift
- JSON
Delete tokens
Token deletion is handled implicitly by theCometChat.logout() method. That is, once the user is logged out of the current CometChat session, his/her registered Push Notification token automatically gets deleted.
The same can be achieved explicitly by making a call to the extension using callExtension method as shown below. However, the token that is deleted belongs to the current session of the end-user by passing all=false as a parameter.
- JavaScript
- Java
- Swift